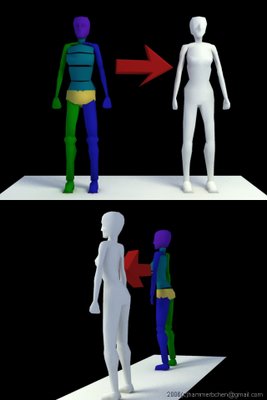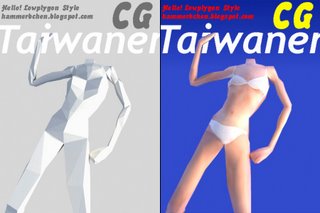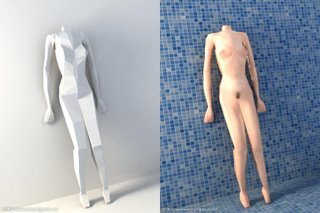
Showing posts with label tutorial. Show all posts

2025/07/22

3ds Max - Vortex Force 旋轉力場的使用教學


Vortex Force是3ds Max裡面的一個很古老的力場,原本是要拿來產生像漩渦或是像龍捲風,暴風那樣的特效。但實際使用上卻往往難以做到。

其實只要注意參數上的細節,像Vortex Force這樣的老工具也能協助做出酷炫的風暴龍捲風特效。關鍵就是Falloff與Damping。

Axial drop, Orbital Speed與Radial Pull都分別有Falloff和Damping的設置。那個Falloff可以看成風暴的半徑,可以用Tape helper去測量大概需要多大的半徑,就知道到Falloff要設置為多少,例如200.0m。而Range要設置為0

Damping是讓力場能緩慢施加,而不是突然產生,效果會更自然。點擊這裡看最終效果。

[相關文章]

2025/06/04

用AI產生影像的技巧 - 提示詞的順序與擺放

1. 提示詞的順序會影響結果。

提示 A:「一位穿著藍色洋裝的女性模特兒,站在迷霧森林中,電影感光影」 

提示 B:「一座迷霧森林,有電影感的光影,出現一位穿著藍色洋裝的女性模特兒」

  提示 A 可能會更強調模特及其外觀,而提示 B 則更偏重場景氛圍與背景。

2. 語意區塊要放在一起(Contextual Grouping),AI 模型傾向於以「語意區塊」來理解語句,因此將相關描述放在一起(如服裝 + 姿勢 + 光線)能幫助AI 建立更清晰的圖像。

3. 避免語意錯配(Clarity of Associations)。若句子結構不夠清楚,AI 可能會將某個特徵套用到錯誤的對象身上——尤其是當形容詞與名詞相距太遠時。

提示 1:「一位年輕女性,柔和光線,沉思表情,身處藍色極簡風房間,穿著黑色背心。」

提示 2:「在一個藍色極簡風房間中,柔和的光線照亮一位穿著黑色背心、表情沉思的年輕女性。」

→ 兩者可能產出相似的圖像,但提示 2 可能會更強調背景與整體氛圍,而提示 1 則可能更集中於人物的特徵與情緒。

2010/10/13

Normal Map 法線貼圖 (三)

這篇是Normal Map系列文章的最後一篇. Normal Map產生的重點不外乎做bevel, smooth group的設定. 如果是對稱的模型, Normal map只做一半會遇到更麻煩的問題. 最後到了遊戲裡面除了normal map以外, light map的UV又是另外一個問題點.


----以下為翻譯
原文連結請點這裡

標題:針對light-maps來拆UV
翻譯: Hammer Chen

沿著材質的X軸做鏡像

這會影響light-map材質與vertex light-maps

Light-maps會用三種不同方像儲存光線,然後根據實際的每個像素法線來做混合。 這三個方向是固定在切線空間。因此,在世界空間會跟材質座標一樣被鏡射,而這個方向只在材質的X軸會對稱。為了確保鏡射邊縫的兩邊都採用相同方向的世界空間,UV貼圖與模型的對稱邊縫會盡可能地垂直。

在鏡像邊縫的兩旁使用相同的世界座標方向是很重要的,因為這樣light-map才能精確地計算出來。如果兩側用了不同的方向,光照貼圖在兩側的邊縫計算就會不正確,最後會導至明顯的縫隙。

切線空間會建立在第一組UV set,因此,這是材質的座標,所以要沿著X軸對稱。

把light-map UVs切開來做對稱。

模型的light-map UVs必須在鏡射的縫隙之間要留幾個texel,這樣做是必要的,因為這兩半沒辦法混合在一起。如果這兩半沒有間距開來,那麼套用到light-maps上面的smoothing filter,或是材質的bilinear texture filtering會讓縫隙產生!

請看這個牆的模型,藉由把法線貼圖沿著x軸對稱可以節省材質空間。

Normal Map 法線貼圖 (二)

這篇是補充Normal Map 法線貼圖 (一)的文章. 挑選裡幾篇比較實戰的文章翻譯整理出來.


----以下為翻譯----
原文請點以下連結

標題: Maya > NormalMap > UDK 工作流程
翻譯: Hammer Chen

crapageddon: 有沒有人可以解釋我哪邊做錯了?

我想要把我在maya高模,用低模貼法線貼圖,放在udk裡面。幾乎要完成了,但是在udk裡面模型看起來一團糟。我自認為我步驟都做對了,有沒有人可以指出我哪邊做錯了,這邊我很快速地做出骷顱頭,當作練習的範例。

以下是我的步驟
1. 建立高模

Normal Map 法線貼圖 (一)

這裡翻譯/整理了幾篇關於Normal Map的文章. 因為字數太多所以分成三篇刊登. 希望對大家有幫助.


----以下為翻譯文----
原文請點以下連結

標題: 法線貼圖
翻譯: Hammer Chen

什麼是法線貼圖(Normal Map)
法線貼圖常常用在低解析度模型,偽裝出高解析度的模型細節表現。法線貼圖的每個像素儲存了法線,法線就是一種向量,紀錄了高解析度模型的表面斜度。紅色、綠色、藍色通道分別控制了每個像素的方向。

當你把法線貼圖到用到低解析度模型,法線貼圖上面的像素會控制了低階析度模型的向量,造成了模型表面更多細節的假象。然而,從側面來看,模型本身並沒有改變。

貼了normal map的低模
沒有貼normal map的低模
高模

2007/02/07

[教學][筆記]human anatomy男女身體建模時關鍵差異


上圖是我以免費的軟體Makehuman 0.9 調整參數後所產生的男性以及女性的人體 輸出成obj格式 在3ds max 7當中以Finalrender stage-1算圖的結果

上次介紹Makehuman 0.9軟體的測試報告. Makehuman一開始的人體模型是不分男女的. 除了豐胸俏臀等簡單的女性特徵外 本文將以解剖學的觀點 列出幾項重要的男女特徵(肌肉 或是骨骼) 以Makehuman軟體作為示範 對於想要3D人體建模的人 提供一些建議

你可以點這裡下載Makehuman軟體

整體而言 女體比男體柔順 曲線平滑. 女性共有七大解剖上的特徵 在3D建模時要特別注意:

(1)正三角形: 女性最明顯的特徵 除了豐胸俏臀外 就是正三角形 可以經由修改肩膀的寬度(shoulder_move_sideways) 以及骨盆的寬度(pelvis_lateral_large)來達到


(2)背後 肩甲骨與臀部線條呈現八字型: 這裡的Makehuman調整肩甲骨的參數並不多 但是臀部一樣可以經由pelvis_lateral_large來調整


(3)側面臀部比肩甲骨突出: 女性背部有平滑的S曲線 而且肩甲骨不可比臀部更明顯. 可以經由調整dorsi_scrawny來改變肩甲骨


(4)女性鎖骨細而明顯: 調整clavicle_scrawny來改變鎖骨


(5)臀部的起點比男性高: 女性有比較高的腰 上身與臀部間的連結也比較平順 這裡可以調整waist_up參數


(6)腿呈現X型腿: 與男性不同 女性的雙腿通常呈現X的交叉狀 這是一個很重要的女性特徵 可以經由leg_x_deform來改變


(7)胸鎖乳突肌比男性纖細: 女性除了沒有喉結外 頸部與肩膀之間的胸鎖乳突肌(Sternocleidomastoid)也比較纖細 可以經由調整neck_scrawny來改變

男性建模反而比女性簡單 共有五項要點:

(1)倒三角型: 很簡單 在Character Setting粗調節時 就可以MESO torso來調整


(2)胸肌: 以pectoral_forward參數調整 當然其他還有許多參數可以微調 這裡省略


(3)僧帽肌: 練過肌肉的男性僧帽肌可能會相當明顯 可以調整trapezious_muscluar


(4)虎背熊腰: 和女性比 男性的肩甲骨比較突出明顯 臀部相對較小. 可以經由dorsi_muscular參數來調整


(5)腹直肌: 要有練過 就會有六塊肌. 調整參數是abdomen_muscular

就像寫Blooger不需要懂每一條html一樣 現在越來越多模組化的軟體能夠使藝術家更專心在創意與創作上 例如: 3D人體產生器Makehuman 0.9. 整體而言 Makehuman 0.9軟體具有相當的彈性產生不同的人體構造 惟女性背部脊椎骨凹陷的效果 個人認為還不夠好. 這裡示範男女結構的差異 有點過度誇大 是為了強調效果. 希望對於學習3D人體建模的人 有概念上的幫助與提示.


[更多教學]


[特別新增]
本站受邀在魚夫大哥成立的 台灣玉山網路電視台, 請大家多多過去參觀.

2006/09/01

[video][tutor]Ultra fast female modeling with Character Studio


Lazy to model a female from scrach? This tutorial demo you model a feamle from Charater Studio Bones within one hour! Easy polygon modeling, good for the very beginger in 3ds max.

video tutorial (total 1h 7mins long, split into 4 video files)
video01
video02
video03
video04
Brief description of this tutorial:
Fisrt create a feamle biped. Load up an image reference.Change proportion of each bones. Convert each bone to editable mesh, delete the faces you don't need. Convert to editable poly. Attach bones and use "taget weld" to weld the vertex. Cut face if necessary.

Finished model with pose and texture:


More video tutorials:
Ultra-Fast series: texturing a female model

Marilyn Monroe-style blow skirt---tips when working with Reactor Cloth

faking human motion with ragdoll maxscript (Hot!)

lights in a spaghetti restaurant

NURBS modeling a PET bottle

Making of canvas shoe (NURBS)

2006/08/23

[video][tutor]faking human motion with ragdoll maxscript


[Related topic]
This project...originally I want to test how the ragdoll maxscript can do, so I test some simple scenes, then I found this is very fun to play with ragdoll. I add more scenes, some scenes is come of movies scenes: Black Hawk Down, Schindler's List, Face-Off...etc.

Ragdoll Maxscript is a free script and very useful. In this tutorial you will learn some interesting faking human motions with ragdoll. And this is my first video tutorial in English, so bare with me. If you found hard to understand my words, plz just watch the screen (video), I think this will help a lot. ^_^
(Note the ragdoll maxscript link, you have to login CGTALK forum to download the new version of the script)
Before you get start, I strongly sugguest you read my previous tutorial, with more detail and basic about the ragdoll script.
VIDEO TUTORIAL (total 1h 22min, split into 6 videos)
Again, this tut is not for beginner. I will only explain the essential concept of each scenes. Plz first read my previous post " Dragonball-like effect " to lean the basic tech of ragdoll script.
(In this 25 numbers of scenes, I used 4 motion capture files: run, walk, jump, kick. if you don't have any motion capture files/bip format, you have to create your own first)
Brife description about the video tutorial:
basic: very simple. create a biped and a plan, select any bone of the biped and run the ragdoll maxscript (new version). Set the mass of biped bone (ie: 1 unit for each). play around with mass, gravity and friction, and you will get different results (GIF click HERE)
chained 01 : use the point-to-point constraint to fix the hands on air. create a wind object to fake that biped is kicking his legs. (GIF click HERE)
chained 02: create 4 point-to-point constraint to fix the biped. play around with wind speed value(GIF click HERE)

arrows: create the motion of arrows and biped separately. create a long box for the arrow object. link the arrow to a dummy object, this way will make it rotate and aim on the biped easily. For the motion of biped ,there are 3 options: (1)extend the original motion capture file by key framing (2)create another box to hit the biped (3)using the momentum(key-frame) within the ruining motion capture file (GIF click HERE)

explosion: very simple. use the body vertical, body horizontal tool to set key for each biped, and the ragdoll script + reactor will do the rest part. (GIF click HERE)


bunker and grenade: grenade is a simple geosphere. change your bunker object to convex mesh hull type, therefore, the grenade can go into the bunker.
(GIF click HERE)
bump into each: create two bipeds and load the same running motion capture files. Adjust the rotation and position of each biped. (GIF click HERE)

bip fan: create a wind object, set the speed value to very high (ie: 5000)
(GIF click HERE)

drag: create point-to-point constrain for two biped's hands. The male is the parent, female as child.
(GIF click HERE)

Swing: same concept as in "drag". The female is the parent, male as child. The motion of female is by key-framing.(GIF click HERE)


Shot: posing each biped like so, only the one to be shot are involved in simulation. The shooter's hand is by key-framing.(GIF click HERE)
balcony: the broken table is a simple box. After creation, convert to edit poly and use the slice tool to slice the table, and use "element" to detach each pieces of table. Select every pieces and apply a fracture collection.(GIF click HERE)
balloon01~04: create a hidden box. put a wind object beneath the box. create spline, the apply a normalize spline modifier to it. add a Reactor modifier and go the vertex level. select upper few (about 3) of the vertex and attach to the box object. select the lower vertex and attach to biped hand. Play around with gravity, wind speed and biped mass to get desired result.(GIF click HERE)(GIF click HERE)(GIF click HERE)(GIF click HERE)


Jump bar: after the biped touch the bar, add 2 point-to-point constrain to the bar and hands(GIF click HERE)
Run and kick: create two bipeds. One load a kick mocap file, another load a running mocap file. in the end of the motion capture key-frame, run simulation.(GIF click HERE)
car jump: run is by loading a running mocap file. Then the jump mocap file. Then the reactor ragdoll simulation. after the biped landing, charge back to a loading mocap file.(GIF click HERE)
suiside: same as jump building, set the col. tolerence to very low (0.2) for the box simulation work properly. (GIF click HERE)


Jump building: same concept as in scene explosion. Play around with gravity, mass...to get the desired result.(GIF click HERE)
Black hawk down: the motion of rope and biped are create separately (independent). First create the rope (spline+normalize spline+reactor rope). link the upper vertex to the helicopter. For the biped, posing the biped like so. First slide the biped down with same posture, then when the rope swing, start biped ragdoll simulation.(GIF click HERE)
Jump balance: same concept as in scene jump building. when the biped jump near the roof, delete all keyframe after the time point. And landing the pied by key framing: select the foots and add a fix key frame, then move center of mass by using body vertical tool.(GIF click HERE)
Stair fall: very simple. create the biped like so and run simulation. Play around the mass, ie: set the right hand mass to 10 unit.
parachute: the hardest scene in in this tutorial. The parachute motion and the biped + rope motion are create separately (independent). Two segments of the parachute motion, in air the motion is by applying a noise modifier, after landing, use the reactor cloth simulating. For the rope and biped, same concept as in balloon scene.(GIF click HERE)


[BONUS]
Motion Capture Pack 1 (16 bip files)


[Off-topic] China officals grabbed Taiwan's flag during ICG

2006/08/13

[tutor]Kamehameha! Dragonball-like effect by using Reactor and Ragdoll Maxscript


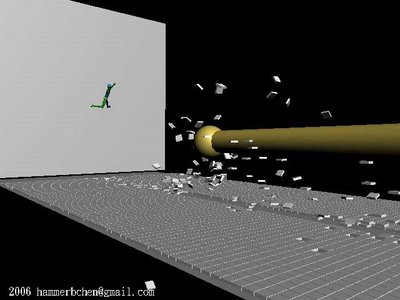
See the final result in GIF please click here
See the final full video click here


[Related post]
faking human motion with ragdoll maxscript (Very Hot!)
AI implant Quickstart (simple crowd simulation)
Crowd simulation (biped) with AI implant (New!)
Crabs and Taiwan (by using CAT plugin)


This is my second 3ds max tutorial in English. Hope you like this tutorial and feel free to make comments, thank you!

This tutorial is not for very beginner in 3ds max, if you have experiments with character studio or 3ds max Reactor, it will be easier to understand.

Dragonball is a very famous Manga on earth, the author is Akira Toriyama (鳥山 明). I like Dragonball and Dr. Slump (another Manga by 鳥山 明) very much, so I decided to make a short video shows Dragonball-like, the "Kamehame-ha!"(or chi) in this tutorials by using 3ds Max Reactor and Ragdoll Maxscript.

P.S: some "Kamehame-ha!" videos on Your tube:
1. The Original Kame Hame
2. Goku releases the Kamehameha
3. Das Finale des 23. Tenkaichi Budokai Turniers (Teil 3)

Although default 3ds max have Ragdoll Maxscript in script folder, but it has some bug, better use this version of ragdoll script. There is a thread discuss about this script in CGTALK. After download the new version off ragdollscript, you can move it to your 3ds max script folder.

In the beginning, I want to make this video render with GI, but as you can see, this tutorial needs lots of tiles (thousands) which mean huge amount of poly-count. My PC is two years old don't have enough power to run it...so..I simplified/optimize some in the scene and render only with "Preview". I only focus on character motions and the flying tiles.
The video was made by several separated setup scenes, I rendered them and edited in Adobe premiere. The scene contain two characters one is attacker (A) and another is defender (B).

clip sequences
(1)the A attack B, and B defended and not hurt.
(2)the B run to A...
(3)the A re attack with deadly attack...
(4)the B....dead.

So let's get start:

I create several elements separately then put together, in this way the animation is much easier to handle. For the defender (B) character, I created there motion files (bip files) for him: defence with his arm-cross, run and "knock out by A and hit the wall".

Character motion file
run
(If you want to use your own run motion, you can skip those steps)
1. create a character (for character B) for about 170 high, type: male
2. create a scenes like so: a big plan for the ground, a wall(box).
2.5 select B and go to motion panel: Turn on motion flow mode, go to motion flow/show graph
3. create clip, load your loop-able run clip. Click on the "create transition..." button then clip on the clip you just create.
4. go to motion, click on the define script button then go back to motion flow graph, click on the clip you create in step 3 for about there times (this will create several run motion for B)
5. Change transition value: first select your transition, go to motion flow panel/ edit transition button. Change transition length to zero, change Source clip start to the end frame (ie: from 10 to 17). Save motion file with bip format. this step make your run clips merge seamlessly.

Tip: you need to consider position, distance before you start.

knock out by A and hit the wall
6. continue. select you character B bones in running. go to motion panel: turn off motion flow then go to copy and paste. Click on copy posture button and save it.
7. now create another character with same height (170). Load the posture you just create. Adjust character position in the scene.
8. select the biped, go to script/run script: select ragdoll script(rctRagdollScript_Xpanded.ms). Pop-out UI: Constrain Humanoid

The character B is actually move backward to hit the wall by him self, not by the attacker Kamehame-like attack.

9. Turn on auto-key. Use Body horizontal move tool to move your biped for some distance, set a key. (This will give your biped some momentum to run the reactor physique simulation)
Tip: move biped upward a little, this will make the result better.

9.5 select the RBCollection01 object, add your plane and wall.

10. Set mass: select wall set it mass, friction...same procedure to the plane and your biped bone.
Note: the plane simulation geometry have to set to Concave mesh! Both Wall and plane have check "unyielding"

11. Go to utility reactor: Preview and animation. Set the start Frame to within the biped movement in step 9 (ie: move from 0-25, the you can set start frame from 23)

12. Run preview. If you don't like the result, go back to step 9-11, change parameters. If it is good, the run create animation (turn on reduce key) and save your biped motion to bip format.

defence with arm-cross
13. Create a biped.

14. Turn auto-key. select biped left (or right) Foot. go to motion panel, set planted key. Now use body vertical button to change the biped, to a bending leg (lower center of mass)

15. Posing your character with arm-cross.
Tip: every time you change posture, turn on autokey, set biped foot planted key again.

16. Now move the time-slider, move your biped backward. set the same key in the first frame.
Note: you have to set a free key for the foot first before you move backward.

17. save your biped file
Tip: check "Segment.....", this will avoid problem.


Tile flying effect
you are going to creat lots of tiles (box), thousands...reduce them if you have to. In this part, optimizing is everything.

The flying tiles is ascually hit by a hidden geosphere beneth the plane ground, not by the kamehameha-like chi

18. Create small boxes over the plane but do not touch the plane. (I create a 3*80 array of tile in the middle of the plane for reactor simulation and on the right and left side create 20*80 array of tile just a dummy object not involve in physique calculation.)
Tip: randomly delete some tiles will give more realism

19. Create a moving geosphere under the plane. The timing should match your flying character...and the sphere should touch the tiles box.
20 select the RBCollection01 object, add your plane and wall and the tiles (box)

21. Set the mass of geosphere. Check unyielding.

22. Now you can run reactor simulation to see the result.
Tip: you can adjust the friction, mass, gravity or even create a wind...
Note: in Reactor/world col.tolerence, if your simulation unstable you can set the value lower (about 0.7)

Kamehame-like chi itself:
23. Very very simple. Just a geosphere and a Cylinder. I change the high of the cylinder over time... In the end the chi disappear...I just change the radius value to zero.
Tip: Lets say your chi run from 0-100 frames. It disappear at 100 frame. set a zero radius value at 100 frame and before a few frame (ie: 98) set the value to 100%. This will ensure your Kamehame-like chi disappear very soon.
Tip: add a taper modifier to the cylinder give more effect.

Others:
Others motion are quiet easy and simple.

24. Complete. Now you can put them together in one scene and Run "make preview" or normal rendering.


(Kamehameha or Dragonball belong to their company, if the owner don't want me to show this tutorial, I will remove it right away)


[link] faking human motion with ragdoll maxscript (video! )
[link] Kienzan! Dragonball-like effect part 2(video!)

2006/08/12

[tutor]breasts bounce simulation by using blubber 1.0 Maxscript


See final result please click here


This tutorial is intend to simulate a natural breasts bounce. You can apply to other part of body if want to. As you know I am not a native English speaker, if you find any error or wrong English please e-mail me or make a comment in this thread.

This tutorial is not for very beginner in 3ds max, if you have experiments with character studio or morpher modifier, it will be easier to understand.

Blubber 1.0 maxscript is created by Andy in CGEmpire. This script is "a simple tool for adding and controlling secondary motion using morph targets". Click here to download the script. Demo 1 and Demo 2. Very thanks Andy and CGEmpire for such useful tool. So let's get start:

Installation:
1. download the blubber 1.0 maxscript from CGEmpire. Unzip it and copy all the bitmap to 3ds max installation path folder "UI" (ie: C:\3dsmax6\UI)
2. start 3ds max (version 6, 7 or 8)
3. Go to Customize/Customize User Interface, click on Toolbar Tab: MainUI , Category and you will see "CGEmpire Tools" from pull-down menu. Now on the right hand, click the New to create a new toolbar then drag the "CGEmpire Tools icon" to the new toolbar you just created.
Now the blubber maxscript is fully installed.

You must have a breast model in this tutorial. You can create you own or download a free breasts model from Turbo Squid (You must register first to download). In this tutorial I use a breast model(lwo format) created by Tomwoof. If you want to use your own model, try not to use too complex or too low polygon model.

Scene Setup
4. In max, create a character rig by using character studio.
Tip: create a Female body type model, this will make it easier when you rigging your breasts model.
5. import you breasts model, re size it to match the size of your character rig's breasts.
6. select the breasts model, hold down shift key and drag to create more there copy of the breasts model. Now you have 4 same models in your scene. Please rename them to : breast, breast-up, breast-left and breast-out.

The for models will be used for morpher targets. Now you have to modify your model that have the look of bounce up, bounce left and bounce out.

7. select the breast-up model, in Edit Mesh (or edit poly) mode, select its nipples, turn on soft selection, change the Falloff(value around 0.14) to select the breasts. Now use your move and rotate tool to modify your model so it looks like bouncing upward. Same procedure to the breast-left and breast-out model.
Tip: exaggerate the effect is recommended, you can fine-tune it latter on.

Bone and rigging
8. select the breast model and apply a physique modifier to it: click on "attach to Node" button then select bip01 (the one character you just create). Go to Sub-object level/envelope, select spline2 them adjust "Radio Scale" and "Parent, Child overlap" value to let the envelope fully cover the breast model. Move around your character to see if the rig works and no problem.

9. Setup the morpher: select the breast model and apply morpher modifier to it: Go to Sub-object level, load multiple targets. Select all other 3 breast model.
Tip: set the Global setting: Max=100 Min=-100 Limits. This will ensure your bounce breasts move move naturally.

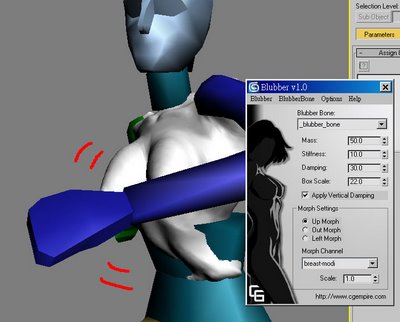
10. Now time to use the Maxscript: Blubber 1.0. Select the breast model then click on the blubber button, pop-out the blubber user interface. Go to blubber bone/add blubber bone to create bone for your breast(it is a max dummy object). Move it to the position of the breast model and re size it to cover all the breast region.

11. In the pull-down menu of blubber: select blubber bone/select parentbone, select bip01 spline2. and in the Blubber Bone/Select TargetMesh, select your breast model.

12. Set the mass, stiffness and damping value of your breast. Set the there orientation (up, out and left) to its corresponding morph channel.
Tip: if your mass, stiffness and damping value already looks all right, change them seems to me won't have too obvious effect. As long as you not set the damping value to zero, this will make the breasts too old looking.

Note: Since this script work likes other physics simulation plug-in, remember to turn off "real time" and "loop" playback. When playing animation, the simulation will run and bake the motion data to your model. If the real time option turn on, you will see error results.

Every time you run the simulation, remember to click the "Go to start" button twice, and go to Blubber/update Scene. If you want to recalculate, select the breast model, delete all the key-frames.

So how to run simulation and baking the motion in your model? Just turn on auto key frame and Play animation, the blubber script will do the rest.

Simulation
13. Create animation to your character or load a motion capture file.
14. Select the breast model, go to morpher modifier so you can observe the morpher channel value changing in real time. Turn on auto key-frame then hit play animation...now the blubber run simulation, baking keyframes to your breast model. Observe the morpher channel value, if the value is higher than 100 or lower than -100, then its no good.
Tip: If the result is unnatural, you can change the scale value in blubber script UI.

15. Delete the blubber dummy (because the motion data has already baked into your model morpher modifier)

16. Select the breast model. Go to Graph Editor/ Track view Curve Editor, select "Morpher Modifier" then go to pull-down menu key/ reduce key to optimize the key-frames.
Tip: Best breast bounce curve should move around zero value [+/-] 80

17. Continue. Select different Morpher channel (up, out or left), select all keys and move it toward the zero value. Then Scale value to enhance the bounce effect around 80%.

18. Complete. Now you can render the animation to see the result.

Discussion threads
CGEmpire Forum, Blubber thread01. (Start by Andy---The Blubber script author)

CGEmpire Forum, Blubber thread02.

Tutorial in Traditional Chinese

Discussion in HALLUCINO Forum (Japanese)

FX3D (Korea) (New!)
More free tutorials
Marilyn Monroe-style blow skirt

faking human motion with ragdoll maxscript

Kamehameha! Dragonball-like effect by using Reactor and Ragdoll Maxscript

Marilyn Monroe-style blow skirt---tips when working with Reactor Cloth

Sparkler writing in 3ds max with Trail 3.0 (Hot!)
Food in Taiwan: A steamed bun (Taiwanese)

Quick Shrimp Modeling &Texturing (Taiwanese)

Hang death by using Reactor Rope + Ragdoll Maxscript (Taiwanese)

Off-topic
China officals grabbed Taiwan's flag during ICG


2006/08/10

[教學][筆記]HDRI (High Dynamic Range Image)簡單實用的解釋

HDRI就是High dynamic rage image高動態影像.

玩過數位相機的是否有以下經驗: 要拍天空的雲朵 同時要拍人像時 如果要把天空的雲拍清楚 人像就會過黑 如果要把人拍清楚 天空就會ㄧ片白 雲朵都不見了

這是因為相機的感光元件每次只能接受一定範圍的光度 (換句話說 相機是low dynamic range低動態範圍) 超過這個範圍 不是全黑就是全白沒有分辨率了. 所以就造成了兩難的局面 是要拍攝人臉清楚呢? 還是要天空的雲朵? 能夠同時兼顧的話其實很難也很複雜 ㄧ般是讓測光範圍介於天空與人像之間 就能達到原本想要的折中效果了

是否有以下經驗: 看完電影出來室外 發現外面好亮 都看不清楚 這種情況就像是上述拍相機時遇到的困難ㄧ樣 然而人眼與人腦很厲害 再數秒鐘便可以解決這個難題 瞳孔縮小 等等的生理機制

相機要如何產生High dynamic rage image高動態影像 很簡單也很直覺 就是用不同曝光時間多拍幾次就可以 剛剛舉的例子 就先用最慢的曝光時間 拍攝天空 然後將曝光時間遞增 連續拍攝...最後再用軟體計算 將這些影像疊加起來 就可得到ㄧ張 如人眼看到的一般---HDRI影像了.

還是不懂HDRI嗎? 看看這個網頁有圖片 或許會幫助你理解HDRI如何產生.

想想看戶外場景假設所有的光度範圍是1000度 而你的相機一次只能涵蓋200度 所以就是拍攝1000/200=5次 便可以得到涵蓋所有範圍的影像了

HDRI理論雖然複雜 但是應用在3D繪圖當中卻是非常直觀 甚至用不到High dynamic rage 這樣的功能. High dynamic rage image高動態影像 簡單的說就是ㄧ張影像 但是你可以調整這張影像的亮度/曝光程度 與ㄧ般的圖片差別最大就在這裡.

在3D繪圖當中 HDRI最大的功能就是讓照明更真實 原因就是把HDRI當成ㄧ個球型或是方形的光源 去照明場景當中的物體 這樣一來 場景的天光skylight不再是均勻的藍色 而是富涵顏色變化的光源了 這就是為何HDRI照明的算圖結果 能夠產生逼真的效果. 而這樣的效果 不ㄧ定要調整HDRI當中的亮度 就可以達到.

電影當中的HDRI應用 最重要就是讓CG影像和實景能夠無縫的融合在一起 原因就是使用相同的光源. 例如在拍攝蜘蛛人時 現場實景拍攝時 電影工作人員除了拍攝真實的演員外 他們還會另外利用反光球(類似聖誕節買到的裝飾球)收集當時場景的光源---HDRI影像 再利用這個HDRI影像對CG合成的蜘蛛人進行打光 這樣當把實景與CG合成的人物結合在一起時 因為光源ㄧ致 CG影像和實景就能夠無縫的融合在一起了.

想要自己做HDRI嗎? 這裡教你用便宜的材料(耶誕節裝飾球) 製作自己的HDRI影像.

[相關文章]

2006/08/09

[教學][筆記]3分鐘學會使用3ds max內建的全局照明 global illumination

本教學寫給沒有Vray或是FinalRender外掛的使用者 但是想要用全局照明算出真實的影像的人. 如上圖由左至右分別為: 內定的算圖結果, 光跡追蹤, 輻射. 後兩個都算是全局光源的運算 但是看起來是光跡追蹤(light tracer)效果最好 因為輻射(radiosity)需要時間去調整參數. 喜歡的話就把光跡追蹤(light tracer)的算圖方法學起來吧!

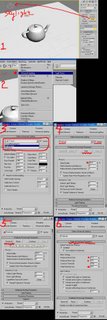
請參考右圖
1. 先建立一個skylight天光 注意 天光不分大小 方向 把天光倒過來也沒關係.
2. 如圖去啟動advanced lighting/light tracer, 然後直接去render算圖 就可以得到上圖中的light tracer美美的茶壺了!
3. adevanced lighting還有另外一種運算方式 就是輻射法(radiosity) 依圖切換過去吧
4. 觀念: a. 輻射法算圖前要先做運算 電腦會把運算的結果存起來 所以如果你改了參數 記得要把先前存的結果刪除 在進行運算 b. 輻射法算圖常常搭配exposure control曝光控制使用 要得到良好的算圖結果 就要選擇適當的曝光控制.
先按下"START" 進行運算 然後你就直接render算圖看看結果....應該是不滿意吧(輻射法會將場景的物體進行幾何分割 一般來說分割越細 算圖越精確)
5. 按下Reset All刪除剛剛運算的結果
6.依圖去調整輻射法的參數 (通常數值越小 分割越細緻) 然後再次點擊START運算 最後再算圖看看結果


要得到好的全局照明必須要有耐心去調整參數 這裡提供快速教學 希望對想要真實算圖效果的人有幫助

補充: Radiosity比較適合室內運算 所以這裡的場景並不適合用 Radiosity (網友innison提醒)

[相關連結]

2006/08/08

[教學][筆記]我該用哪種抗鋸齒濾鏡(Antialiasing filter)呢?

抗鋸齒濾鏡(Antialiasing filter)一般在改參數調條件時 我都是關閉的 正式算圖就會開啟 常常看到有些人有抗鋸齒的作品而且影像還很銳利 到底是如何達到的呢?

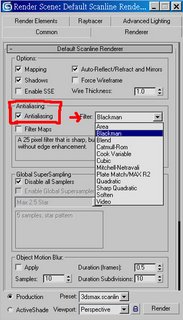
仔細看了一下抗鋸齒濾鏡(Antialiasing filter)的參數: 內建的就是Area 其他還有很多種類的filters 共有12個我的老天阿 這麼多個

舉幾個比較有用的吧: Blackman使場景全部銳利, Catmull-Rom能夠使場景物體的邊緣增強銳利; Video很適合作為輸出至NTSC video tape時候使用 也就是動態影像使用啦 可以減少不想要的影像鋸齒


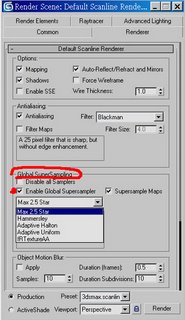
另外就是超級取樣(supersampling) 其實也算是一種的抗鋸齒 可以把它看成是更進階的抗鋸齒 它算是能夠增加原本的樣本數 決定最終的運算影像 好處就是能夠讓bump map等等的貼圖顯示的更加細緻自然 沒有鋸齒 但是同樣會大大增加你運算時間 總共有4種超級取樣 前3種都有隨機取樣的觀念 最後一種不是隨機取樣

我猜最後一種(MAX 2.5 STAR)所花的時間最久吧!

2006/08/07

[教學]做一個肉包子steamed bun

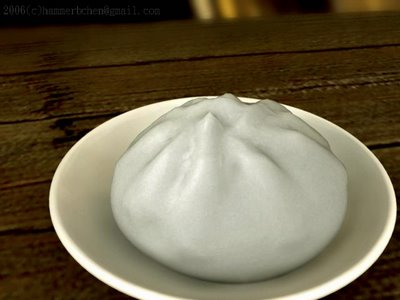
主要是使用Clay studio Pro plugin建模; 原本是要用MetaReyes製作 但是無法成功安裝 所以找了類似的軟體 就是Clay studio Pro . 這兩個外掛的強處就是像黏土般的建模 這種建模方式我認為很適合拿來做包子 用其他方式建模一定很困難.
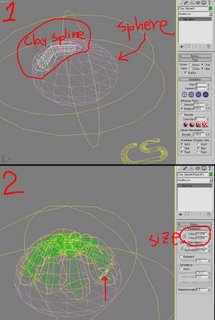
這類的外掛都必定有一個metaball或是blobmesh 就是球狀體 把球一個個粘起來 建立一個你想要的形狀 就是這樣的概念. 除了球狀外 還有圓柱狀 ,Clay studio Pro 還提供了Clay spline 建立比較不規則的形狀. 其實3ds max 6內建就有這樣的功能了 在Compund Objects/Blobmesh 只是功能太陽春 可能執行效率也不好. 但是我相信用3ds max 6內建的功能(Blobmesh)一定也能達到相同的效果.
開始建模吧! (1)首先建立一個sphere然後把它壓扁(2)在utility中發現Clay studio Pro 的轉換工具 把sphere轉成Clay studio Pro 支援的物件類型(簡單的說就是把sphere變成黏土啦) (3)在sphere上方拖拉出Clay spline(三個節點即可) (4)調整每個節點的大小 (5)複製剛剛建立的Clay spline使這樣的長條狀物體在sphere上方圍繞一圈 看起來好像是包子上方的條紋一般 (6)選取每個spline的節點 調整大小 使最終的效果像一個包子 (想像在捏黏土一般)
註: 必須建立一個Clay surface然後把所有元件及何在一起 元件之間才會融合在一起
這裡的重點就是適度的調整Clay spline每個節點的大小 要有耐心 最好是拿包子的照片邊做邊參考
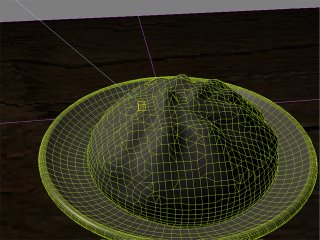
用Clay Studio建模完成後 我轉成edit ploy, 然後給予FFD4X4X4 微調包子的外型 使其更加自然.
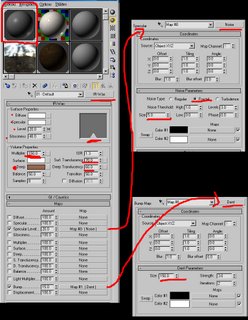
材質部分我使用Finalshaders Wax材質 參數調整如圖. bump map給予dent map使包子表面有質感. Spetecular level給予noise使包子反光面呈現自然的反光圖案.

2006/08/03

[教學]Sauce醬油材質教學

醬油有一種半透明的感覺 普通的材質不容易做到 本例用fr-advanced material. 關鍵如右圖 設定absorption=20 顏色設的黑黑的 如此一來就會有不透光的感覺 效果請參考 這裡

軟體使用: Cebas Finnalrender stage-1

[相關連結]利用blobs 6.0建立wasabi芥末 建模+材質