

See the final result in GIF please click here
See the final full video click here
[Related post]
faking human motion with ragdoll maxscript (Very Hot!)
AI implant Quickstart (simple crowd simulation)
Crowd simulation (biped) with AI implant (New!)
Crabs and Taiwan (by using CAT plugin)
This is my second 3ds max tutorial in English. Hope you like this tutorial and feel free to make comments, thank you!
This tutorial is not for very beginner in 3ds max, if you have experiments with character studio or 3ds max Reactor, it will be easier to understand.
Dragonball is a very famous Manga on earth, the author is Akira Toriyama (鳥山 明). I like Dragonball and Dr. Slump (another Manga by 鳥山 明) very much, so I decided to make a short video shows Dragonball-like, the "Kamehame-ha!"(or chi) in this tutorials by using 3ds Max Reactor and Ragdoll Maxscript.
P.S: some "Kamehame-ha!" videos on Your tube:
1. The Original Kame Hame
2. Goku releases the Kamehameha
3. Das Finale des 23. Tenkaichi Budokai Turniers (Teil 3)
Although default 3ds max have Ragdoll Maxscript in script folder, but it has some bug, better use this version of ragdoll script. There is a thread discuss about this script in CGTALK. After download the new version off ragdollscript, you can move it to your 3ds max script folder.
In the beginning, I want to make this video render with GI, but as you can see, this tutorial needs lots of tiles (thousands) which mean huge amount of poly-count. My PC is two years old don't have enough power to run it...so..I simplified/optimize some in the scene and render only with "Preview". I only focus on character motions and the flying tiles.
The video was made by several separated setup scenes, I rendered them and edited in Adobe premiere. The scene contain two characters one is attacker (A) and another is defender (B).
clip sequences
(1)the A attack B, and B defended and not hurt.
(2)the B run to A...
(3)the A re attack with deadly attack...
(4)the B....dead.
So let's get start:
I create several elements separately then put together, in this way the animation is much easier to handle. For the defender (B) character, I created there motion files (bip files) for him: defence with his arm-cross, run and "knock out by A and hit the wall".
Character motion file
run
(If you want to use your own run motion, you can skip those steps)
 1. create a character (for character B) for about 170 high, type: male
2. create a scenes like so: a big plan for the ground, a wall(box).
2.5 select B and go to motion panel: Turn on motion flow mode, go to motion flow/show graph
3. create clip, load your loop-able run clip. Click on the "create transition..." button then clip on the clip you just create.
4. go to motion, click on the define script button then go back to motion flow graph, click on the clip you create in step 3 for about there times (this will create several run motion for B)
5. Change transition value: first select your transition, go to motion flow panel/ edit transition button. Change transition length to zero, change Source clip start to the end frame (ie: from 10 to 17). Save motion file with bip format. this step make your run clips merge seamlessly.
Tip: you need to consider position, distance before you start.
knock out by A and hit the wall
6. continue. select you character B bones in running. go to motion panel: turn off motion flow then go to copy and paste. Click on copy posture button and save it.
7. now create another character with same height (170). Load the posture you just create. Adjust character position in the scene.
8. select the biped, go to script/run script: select ragdoll script(rctRagdollScript_Xpanded.ms). Pop-out UI: Constrain Humanoid
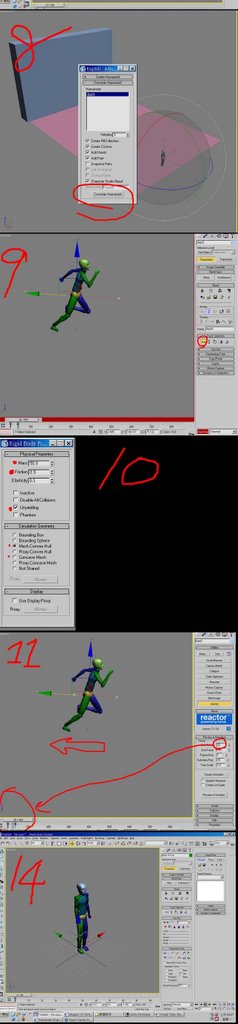 The character B is actually move backward to hit the wall by him self, not by the attacker Kamehame-like attack.
9. Turn on auto-key. Use Body horizontal move tool to move your biped for some distance, set a key. (This will give your biped some momentum to run the reactor physique simulation)
Tip: move biped upward a little, this will make the result better.
9.5 select the RBCollection01 object, add your plane and wall.
10. Set mass: select wall set it mass, friction...same procedure to the plane and your biped bone.
Note: the plane simulation geometry have to set to Concave mesh! Both Wall and plane have check "unyielding"
11. Go to utility reactor: Preview and animation. Set the start Frame to within the biped movement in step 9 (ie: move from 0-25, the you can set start frame from 23)
12. Run preview. If you don't like the result, go back to step 9-11, change parameters. If it is good, the run create animation (turn on reduce key) and save your biped motion to bip format.
defence with arm-cross
13. Create a biped.
 14. Turn auto-key. select biped left (or right) Foot. go to motion panel, set planted key. Now use body vertical button to change the biped, to a bending leg (lower center of mass)
15. Posing your character with arm-cross.
Tip: every time you change posture, turn on autokey, set biped foot planted key again.
16. Now move the time-slider, move your biped backward. set the same key in the first frame.
Note: you have to set a free key for the foot first before you move backward.
17. save your biped file
Tip: check "Segment.....", this will avoid problem.
Tile flying effect
you are going to creat lots of tiles (box), thousands...reduce them if you have to. In this part, optimizing is everything.
The flying tiles is ascually hit by a hidden geosphere beneth the plane ground, not by the kamehameha-like chi
18. Create small boxes over the plane but do not touch the plane. (I create a 3*80 array of tile in the middle of the plane for reactor simulation and on the right and left side create 20*80 array of tile just a dummy object not involve in physique calculation.)
Tip: randomly delete some tiles will give more realism
19. Create a moving geosphere under the plane. The timing should match your flying character...and the sphere should touch the tiles box.
20 select the RBCollection01 object, add your plane and wall and the tiles (box)
21. Set the mass of geosphere. Check unyielding.
22. Now you can run reactor simulation to see the result.
Tip: you can adjust the friction, mass, gravity or even create a wind...
Note: in Reactor/world col.tolerence, if your simulation unstable you can set the value lower (about 0.7)
Kamehame-like chi itself:
23. Very very simple. Just a geosphere and a Cylinder. I change the high of the cylinder over time... In the end the chi disappear...I just change the radius value to zero.
Tip: Lets say your chi run from 0-100 frames. It disappear at 100 frame. set a zero radius value at 100 frame and before a few frame (ie: 98) set the value to 100%. This will ensure your Kamehame-like chi disappear very soon.
Tip: add a taper modifier to the cylinder give more effect.
Others:
Others motion are quiet easy and simple.
24. Complete. Now you can put them together in one scene and Run "make preview" or normal rendering.
(Kamehameha or Dragonball belong to their company, if the owner don't want me to show this tutorial, I will remove it right away)
[link] faking human motion with ragdoll maxscript (video! )
[link] Kienzan! Dragonball-like effect part 2(video!)
1 comment:
i wish i can make my one ragdoll thingy
Post a Comment