這篇文章跟動畫有關嗎? 別罵我 因為我要上傳動畫教學影片到這些網站哩 原本以為用教學影片可以省很多打字時間 結果反而在轉檔時耗費更多時間 相信以後會越來越順
Youtube的優勢
1. 檔案種類多 (這點很重要 就是人氣嘛)
2. 免事先審核(不用等1天)
3. 可以嵌入網頁(事實上Google video亦可 只是比較多人這樣做)
4. 老闆之一是台灣人(算是優勢 嘿嘿)
Google video的優勢
1. 上傳大小無限制 (Youtube限制為一般會員100MB內 10分鐘內 ;導演級的一樣限制為100MB內 但是不限制影片長度)
2. 其他優勢....我目前還看不到
類似的網站還有:
http://www.metacafe.com/ 優勢是影片都很好笑 而且可以放色情的(笑) 我喜歡他連續推薦影片的效果/介面

2006/08/25
[video][tutor]Modeling with Reactor
(Warning: Chinese pig get out of here!)
Using Reactor + Snapshot create an interesting model.
[download] CG Taiwaner release Motion Capture Pack 1
Hi all:
Thank you for supporting CG Taiwaner. CG Taiwaner release a mocap pack from scenes in"faking human motion with ragdoll maxscript " tutorial.
This is a video tutorial demo you how to use this Mocap Pack
download mocap pack1 click HERE (1.3MB rar, 16 bip files)
(Note: There are no run, walk, jump mocap files in this pack)
[資源]免費動作捕捉檔Motion Capture下載包與使用教學影片
下載包 使用教學(英文)
本站即將邁入4000人次大關 為了回饋網友 提供了動作捕捉檔下載包(含16個動作, 格式bip檔) 這些動作都是來自Ragdoll Maxscript所產生的. 請參考教學 利用Ragdoll Maxscript建立角色運動的效果
點這裡下載 (1.3MB rar)
本站也將繼續努力提供優質的教學服務 感謝您的支持
(請注意 下載包當中 不包含 跑 跳 踢 走的動作)
本站即將邁入4000人次大關 為了回饋網友 提供了動作捕捉檔下載包(含16個動作, 格式bip檔) 這些動作都是來自Ragdoll Maxscript所產生的. 請參考教學 利用Ragdoll Maxscript建立角色運動的效果
點這裡下載 (1.3MB rar)
本站也將繼續努力提供優質的教學服務 感謝您的支持
(請注意 下載包當中 不包含 跑 跳 踢 走的動作)
2006/08/24
[教學][影片] 利用Ragdoll Maxscript建立角色運動的效果
算是一個練習計畫. 原本是要模仿Endorphin軟體demo的一些場景 試試看ragdoll maxscript能夠做到多好. 後來越做越起勁 加了幾個電影場景的效果( 變臉, 辛德勒的名單, 黑鷹計畫...)
ragdoll maxscript是完全免費的 可以達到逼近業界的效果 雖然不是很完美. 這個教學共有25個場景 如果都學會的畫足以應付你人物動作特效的需要. 我錄製了教學影片 說了一口破英語...應該可以看著螢幕練習 不要聽聲音就會懂了 (笑)
破英文的教學影片(共1小時22分 分割成6個片段, 抱歉聲音有點小)
影片01
影片02
影片03
影片04
影片05
影片06
這個教學不適合初學者 請先觀看我之前 龜派氣功的教學單元. (本教學需要約4個動作捕捉檔案: 跑 踢 跳 走路 請先準備好 或是自己做亦可.)格式為bip檔. 因為有影片教學 加上我也沒時間講的太詳細 所以這裡就把最重要的觀念寫出來 如果龜派氣功單元能夠完成 這裡25個場景應該也不會難倒你(妳)? (笑)
 basic基本: 很簡單 建立biped與plane. 選取biped任意骨格 執行ragdoll maxscript(新版的喔). 設定骨頭的質量(例如1個單位). 改改質量mass 地心引力gravity 摩擦力friction等等參數 你會的得到不同效果.
chained 01鏈住的角色 : 使用point-to-point constraint 把biped的hand固定住. 建立wind物體吹動biped使角色看起來好像在踢腳.
chained 02鏈住的角色: 建立4個point-to-point constraint . 改變wind的速度可以得到不同效果.
arrows射箭: 稍微複雜一點. 箭的運動與角色的運動其實是無關的(分別建立的). 建立長長的box當作箭. 建立一個dummy使box連到dummy 這樣一來 轉動dummy 箭也會跟著座標移動 用此方法瞄準biped 非常方便. 建立biped運動有三種方法(1)建立另一個box 建立keyframe去撞擊biped (假裝是箭物體) 然後biped便會因此擊倒 (2)直接利用動作捕捉檔所含的keyframe進行模擬 (3)延伸動作捕捉檔的資料 自己用手動增加key-frame 假裝biped被箭擊中
explosion爆炸: 非常簡單. 利用body vertical, body horizontal 兩個工具為角色建立key-frame. 改變五個角色的質量 gravity等等參數 你會得到不同效果
 bunker and grenade碉堡與手榴彈: 手榴彈是用geosphere建立的. 基本上概念和射箭的場景類似. 這裡要注意的是 碉堡要更改物件類型為convex mesh hull type 這樣手榴彈才能在reactor模擬中穿透窗戶.
bump into each撞在一起: 建立兩個biped. 分別載入相同的跑步動作捕捉檔.調整兩者的角度與位置(這樣才能撞在一起啊)
bip fan大電扇: 靈感萊自電影 變臉. 建立wind物體 打speed調到很高約5000單位
drag拖拉: 電影嗎? 好像很多殺人片都有類似場景.一樣很簡單 建立point-to-point constrain 把兩個人的手連在一起. 其中女性是用手動keyframing, 而男性是ragdoll模擬.
Swing甩掉: 跟拖拉的場景其實差不多啦 應該容易了解
 Shot槍擊: 模仿辛德勒的名單的場景. 只有被射擊的那個人參與reactor模擬. 槍手的動作是keyframing.
balcony fall陽台掉下: 主要是那個桌子. 桌子是用一個沒有分段數的box建構. 轉成editable poly後 以slice 切成片段. 然後以element選取各個片段 detach它們. 選取所有片段 然後給予 fracture collection參與模擬.
balloon01~04氣球: 很簡單 氣球體本身沒有參與在模擬當中 我是建立一個隱藏的box 把box下方放置一個wind物體 然後在box下方接一個reactor rope (建立spline 給予normalize spline modifier + reactor rope) 選取rope 上方的vertex(至少3個), attach到box上, 然後選取rope下方的vetex attach到biped的手. 必須調整gravity 與質量等參數 才能達到想要的效果. 風的強度也很重要.
 Jump bar幹桿: 在biped接觸到棒子時 建立兩個 point-to-point constrain 把手與桿子連在一起
Run and kick跑與踢: 分別建立biped 載入跑與踢的動作檔. 調整角度. 把時間軸改到兩個動作終止時 進行ragdoll模擬
car jump跳汽車: 用了跑與跳的動作捕捉檔 (以flow把兩個接在一起) 然後進行模擬.
suicide跳樓自殺: 這裡相當簡單 唯一要注意的是 col. tolerence 要設的夠低 大約0.2 這樣箱子才不會亂跳.
 Jump building跳樓撞牆: 和爆炸場景很類似. 要調整gravity , mass等. 建議把gravity調成50~200左右
Black hawk down黑鷹計畫: 有一點小複雜. 這裡人與繩索的動作其實是分開建立的. 人的動作分成兩段 第一段是滑動向下 我只用相同的姿勢而已 第二段是當繩索甩動時 開始進行ragdoll模擬. 繩索的建立和氣球教學一樣.
Jump balance跳樓平衡: 成功版的跳樓(笑) 其實是差不多啦 只是你要調整一下跳上去的角度 使最終模擬時 biped能在樓頂左右. 當模擬完後 刪除後面不需要的key 然後選取角色的foot 建立fix key然後以body vertical移動重心 使角色看起來自然地降落在屋頂.
Stair fall: 非常簡單. 可以玩玩左右手的質量 例如左手質量為10 並且把左手往前擺 這樣biped就會往前落下.
parachute降落傘:最複雜的一個場景. 降落傘的動作與角色+繩索是完全分開製作的. 關於降落傘再空中時 其實沒有參與模擬 只是加了一個noise modifier. 當降落傘落地時 才開時參與模擬. 關於降落傘的製作 請參考之前的教學(瑪麗蓮夢露飛起的裙子)
[相關文章]
2006/08/23
[video][tutor]faking human motion with ragdoll maxscript
[Related topic]
This project...originally I want to test how the ragdoll maxscript can do, so I test some simple scenes, then I found this is very fun to play with ragdoll. I add more scenes, some scenes is come of movies scenes: Black Hawk Down, Schindler's List, Face-Off...etc.
Ragdoll Maxscript is a free script and very useful. In this tutorial you will learn some interesting faking human motions with ragdoll. And this is my first video tutorial in English, so bare with me. If you found hard to understand my words, plz just watch the screen (video), I think this will help a lot. ^_^
Ragdoll Maxscript is a free script and very useful. In this tutorial you will learn some interesting faking human motions with ragdoll. And this is my first video tutorial in English, so bare with me. If you found hard to understand my words, plz just watch the screen (video), I think this will help a lot. ^_^
(Note the ragdoll maxscript link, you have to login CGTALK forum to download the new version of the script)
Before you get start, I strongly sugguest you read my previous tutorial, with more detail and basic about the ragdoll script.
VIDEO TUTORIAL (total 1h 22min, split into 6 videos)
Again, this tut is not for beginner. I will only explain the essential concept of each scenes. Plz first read my previous post " Dragonball-like effect " to lean the basic tech of ragdoll script.
(In this 25 numbers of scenes, I used 4 motion capture files: run, walk, jump, kick. if you don't have any motion capture files/bip format, you have to create your own first)
Brife description about the video tutorial:
 basic: very simple. create a biped and a plan, select any bone of the biped and run the ragdoll maxscript (new version). Set the mass of biped bone (ie: 1 unit for each). play around with mass, gravity and friction, and you will get different results (GIF click HERE)
chained 01 : use the point-to-point constraint to fix the hands on air. create a wind object to fake that biped is kicking his legs. (GIF click HERE)
chained 02: create 4 point-to-point constraint to fix the biped. play around with wind speed value(GIF click HERE)
arrows: create the motion of arrows and biped separately. create a long box for the arrow object. link the arrow to a dummy object, this way will make it rotate and aim on the biped easily. For the motion of biped ,there are 3 options: (1)extend the original motion capture file by key framing (2)create another box to hit the biped (3)using the momentum(key-frame) within the ruining motion capture file (GIF click HERE)
explosion: very simple. use the body vertical, body horizontal tool to set key for each biped, and the ragdoll script + reactor will do the rest part. (GIF click HERE)
 bunker and grenade: grenade is a simple geosphere. change your bunker object to convex mesh hull type, therefore, the grenade can go into the bunker.
(GIF click HERE)
bump into each: create two bipeds and load the same running motion capture files. Adjust the rotation and position of each biped. (GIF click HERE)
drag: create point-to-point constrain for two biped's hands. The male is the parent, female as child.
(GIF click HERE)
(GIF click HERE)
Swing: same concept as in "drag". The female is the parent, male as child. The motion of female is by key-framing.(GIF click HERE)
 Shot: posing each biped like so, only the one to be shot are involved in simulation. The shooter's hand is by key-framing.(GIF click HERE)
balcony: the broken table is a simple box. After creation, convert to edit poly and use the slice tool to slice the table, and use "element" to detach each pieces of table. Select every pieces and apply a fracture collection.(GIF click HERE)
balloon01~04: create a hidden box. put a wind object beneath the box. create spline, the apply a normalize spline modifier to it. add a Reactor modifier and go the vertex level. select upper few (about 3) of the vertex and attach to the box object. select the lower vertex and attach to biped hand. Play around with gravity, wind speed and biped mass to get desired result.(GIF click HERE)(GIF click HERE)(GIF click HERE)(GIF click HERE)
 Jump bar: after the biped touch the bar, add 2 point-to-point constrain to the bar and hands(GIF click HERE)
Run and kick: create two bipeds. One load a kick mocap file, another load a running mocap file. in the end of the motion capture key-frame, run simulation.(GIF click HERE)
car jump: run is by loading a running mocap file. Then the jump mocap file. Then the reactor ragdoll simulation. after the biped landing, charge back to a loading mocap file.(GIF click HERE)
suiside: same as jump building, set the col. tolerence to very low (0.2) for the box simulation work properly. (GIF click HERE)
 Jump building: same concept as in scene explosion. Play around with gravity, mass...to get the desired result.(GIF click HERE)
Black hawk down: the motion of rope and biped are create separately (independent). First create the rope (spline+normalize spline+reactor rope). link the upper vertex to the helicopter. For the biped, posing the biped like so. First slide the biped down with same posture, then when the rope swing, start biped ragdoll simulation.(GIF click HERE)
Jump balance: same concept as in scene jump building. when the biped jump near the roof, delete all keyframe after the time point. And landing the pied by key framing: select the foots and add a fix key frame, then move center of mass by using body vertical tool.(GIF click HERE)
Stair fall: very simple. create the biped like so and run simulation. Play around the mass, ie: set the right hand mass to 10 unit.
parachute: the hardest scene in in this tutorial. The parachute motion and the biped + rope motion are create separately (independent). Two segments of the parachute motion, in air the motion is by applying a noise modifier, after landing, use the reactor cloth simulating. For the rope and biped, same concept as in balloon scene.(GIF click HERE)
[BONUS]
[Off-topic] China officals grabbed Taiwan's flag during ICG
2006/08/18
2006/08/17
[資源]免費的群體運動外掛 free plugin for crowd scene
Crowd It from WorldofPolygon Website
Download video tutorial
支援3ds max 8, 看起來只能製作類似軍隊等的運動 但好像有很好有效率的製作群體的方式 值得ㄧ試
Download video tutorial
支援3ds max 8, 看起來只能製作類似軍隊等的運動 但好像有很好有效率的製作群體的方式 值得ㄧ試
2006/08/16
[資源] Inspired 3D Short Film Production有中文翻譯書了
 書名: 創意3D動畫短片製作Inspired 3D Short Film Production
這本書我買了原文 還2000多元哩 沒想到出了中文翻譯書還不到600元. 不過還好 翻譯翻的不怎麼樣 但是看在便宜的份上 還是值得推薦一下 對於那些有至想要玩3D動畫投稿參賽的同好們 應該是很有用的工具書.
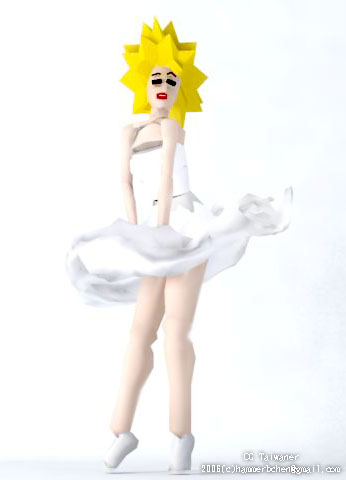
[教學]瑪麗蓮夢露飛起的裙子--使用Reactor Cloth的小技巧
 動態結果請點這裡觀看
 本教學寫給max 6, 7使用者 沒有cloth外掛. 在Reactor Cloth當中建立一個飛揚的旗子很容易 但是要建立漂亮的cloth拓普 美麗的裙子擺動 需要一些小技巧---Delaunay triangulation.
Delaunay triangulation 德勞瑞三角化面法的定義(德文)
如右圖 若是用cone + Tessellation建構的裙子 點的分布太過均勻 方向也ㄧ樣. 如果使用Delaunay triangulation 方法 由NURBS建構出來的面 呈現隨機的點分布 但是分布程度卻是均勻的密度. 這種面最適合作為衣服的模擬.
本教學不適合初學者. 有使用Reactor經驗為佳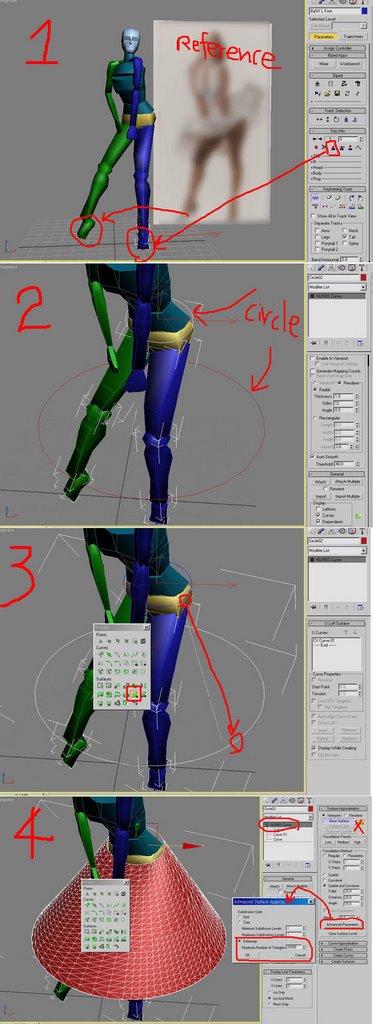 1. 擺pose: 建立一個female character. 參考相片擺pose.
2. 建立circle 然後複製.
3.將其中之一的circle轉為NURBS. 然後attach另一個circle. 利用這兩個circle 以"u"工具建立surface.
4. 改變NURBS的拓普: 到Surface Approx 關閉lock, 到advanced Parameter改變類型為 Delaunay
小技巧: 改變Spacial and curvature/edge 值調低一點 可以讓點的密度增加 但是會增加運算的時間
5. Delaunay法做出的裙子. 但是有一個縫
6. 選取vertex把縫補起來
7. 加Reactor Cloth到你的裙子物體 選取要腰部的vertex 把它固定
8. 建立cloth collection. 建立風 wind. 開始模擬
小技巧: 可以增加rigid body 把腿 與手增加到模擬運算當中
9. 改變骨頭的顏色成為皮膚色 效果更好. Software: 3ds max 7, Finalrender stage-1
[更多教學]
[tutor]Marilyn Monroe-style blow skirt---tips when working with Reactor Cloth
 See the final result click HERE.
 This tutorial is write for those who use max version 6,7 but not 8 or 9. In max 8 and 9 have cloth modifier, but in 3ds max 7, all you got is the Reactor cloth modifier. To make a cloth like flag is very easy, but making good topology for the cloth object, you need some tricks---Delaunay triangulation.
 Definition of Delaunay triangulation (in German)
As you can see, compare with cone + Tessellation, the NURBS surface with delaunay option, the delaunay shows more random but evenly distribution of triangles. The standard object like cone is too even for their vertex, which is not good for cloth simulation.
Again, this tutorial is not for very beginners. If you have experiment with Reactor, it will be easier to understand.
Let's get start:
 1. posing your character: create a female type of character by using character studio. Load up a reference image in your scene. Now just posing...take some time.
Tip: before you posing, you need to make planted key for both foot, therefore, it will be easier to change the center of mass.
2. Create one circle and copy it upward like so.
3. Convert one circle to NURBS, attach another circle, use the "u" tool to create surface from the two circle.
4. Now, time to change the topology of your skirt model. Go to Surface Approx. , Turn off lock, Go to advanced Parameter: change type to Delaunay.
Tip: Change the "Spacial and curvature/ edge" lower will make the vertex denser.
5. The good triangulation of the skirt result (with Delaunay). However, there is a seam.
6. Select the vertex and wild the seam
 7. Apply a Reactor cloth modifier. select those vertex and fix it.
8. Create cloth collection. Create two Wind object. Now you can test the simulation.
Tip: make a rigidbody for the thigh or calf and hand you like.
9. Change the color of character bone to skin color as I did....if you like to. Hair is a simple Hydra. Eyes and lips are lines.
I hope you like this tutorial, thank you for visiting CG Taiwaner.
Software: 3ds max 7, Finalrender stage-1
related topic
[link]breasts bounce simulation by using blubber 1.0 Maxscript
[link]faking human motion with ragdoll maxscript (video!)
Off-topic
China officals grabbed Taiwan's flag during ICG
2006/08/15
2006/08/14
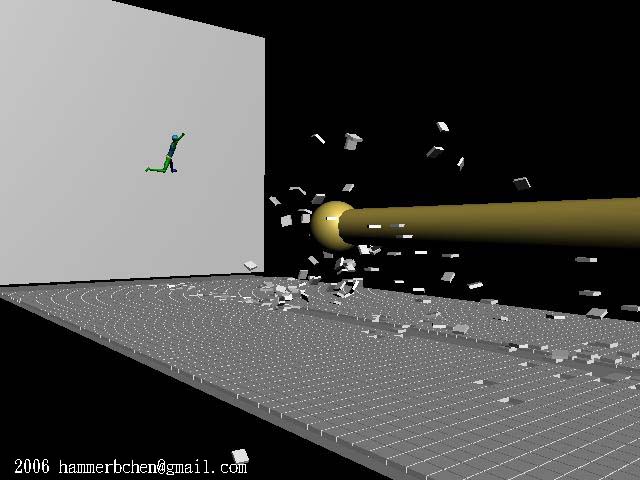
[教學]龜派氣功! 利用Reactor與Ragdoll maxscript製作類似七龍珠的效果製作
點這裡看結果GIF
或是點這裡看video
並不適合完全初學者. 有使用character studio與Reactor經驗會比較容易了解本教學
七龍珠是世界有名的漫畫. 作者鳥山 明. 龜派氣功是龜仙人傳授給悟空的祕技 這裡利用免費的Maxscript Ragdoll進行特效. 安裝下載請點這裡. 請不要使用內建的ragdoll maxscript 那個有一點bug.
在Your Tube上有龜派氣功的video可以看
1. The Original Kame Hame
2. Goku releases the Kamehameha
3. Das Finale des 23. Tenkaichi Budokai Turniers (Teil 3)
因為效率關係 我簡化了場景中的很多效果 例如地磚的數目. 本場景有伊個攻擊者A一個防禦者B. 故事是A先攻擊B 但是B擋住了. 然後B跑步. 最後A給予更大的攻擊 B被擊倒.
 開始吧! 我把動作和地磚飛起的效果分開製作 最後在拼在一起 這樣比較有效率也不會出問題. 角色B我製作了 防禦動作, 奔跑 以及被龜派氣功擊倒的動作.
角色動作
跑(如果你要自己製作跑的動作 這些步驟請省略)
1. 建立一個character (B)大約170單位高 male
2. 建立簡單場景 一個box 與平面plane
2.5 選B 到motion panel: 啟動motion flow mode, 到motion floe/show graph
3. create clip, 載入你的可循環的跑步動作捕捉檔. 點選 create transition 然後點你剛剛載入的clip
4. 到motion panel 點選define script約三次(建立跑步動作)
5. 改變trasition值: 選trasition到motion flow panel/edit trasition 按鈕. 改變trasition長度為0. 改變Source clip start 為其最終frame(例如由10改為17) 儲存動作檔為bip
小技巧: 一開始就要考慮跑步的位置與距離
擊倒
6. 續5. 選B 全部的bone. 關閉motion flow 到copy and paste. 點copy posture然後save
7. 建立另一個character . 載入你剛剛建立的posture 貼上. 調整角色在場頸的位置
8. 選角色 到script/run script 選擇ragdoll script(rctRagdollScript_Xpanded.ms). 出現介面: 按下Constrain Humanoid
事實上角色B是自己後退飛去撞牆的 並不是被氣功打到.
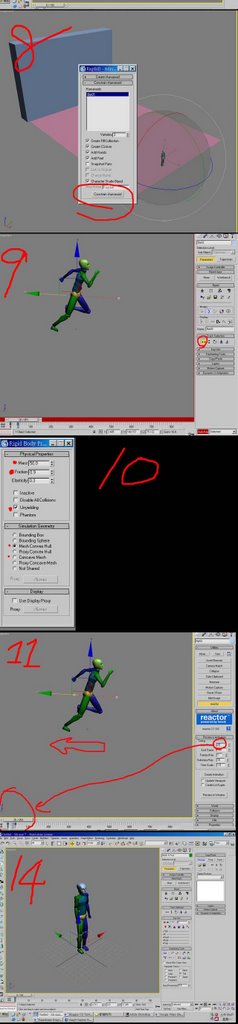 9. 按下autokey. 用 Body horizontal move tool 移動角色一點點, 設定key(這樣可以建立一點動量 等一下可以用reactor運算出運動)
小技巧: 稍稍移動角色往上方移動 這樣角色飛起來的感覺比較明顯
10. 設定質量: 選取牆 地板(plane) 設定質量 摩擦係數...
注意: planae必須設定為 simulation geometry: Concave mesh, 牆與plane都是"unyielding"
11到 utility reactor: Preview and animation. 設定開始的frame 介於角色在步驟9得時間frame之間 (例: 移動0-25frame. 設定起始frame為23)
12. Run Preview. 不滿意就去改9-11步驟當中的參數. 如果滿意就create animation (選reduce key) 然後存動作為bip檔
防禦狀 雙手交叉
13. 建立角色
14. 啟動autokey.選角色的左或是右foot. 到motion panel 設定planeted key. 現在用body vertical button 移動角色重心
15. 修改角色姿態成為手臂交叉狀.
小技巧: 每次改變姿勢 記得設定foot planted key.
16. 移動時間. 移動角色後退 設定完全相同的key
注意: 如要要移動身體 foot必須在設一次free key
17. 存檔為bip
技巧: 勾選 "Segment....." 比較不會出現旋轉的問題
飛起的地磚需要上千的box 減少一點如果你電腦跑不動. 盡可能的最佳化你的場景. 飛起的地磚事實上是被在plane下方隱藏的球撞擊產生的 不是被龜派氣功吹起的
8. 建立小的box 在plane上方但是不要碰動plane(我建立了3*80個 box在中間一排 兩側我建立
 (20*80)的box 但是不參與物理運算.
小技巧: 隨機地 刪除一些box 可以增加真實度
19. 建立一個往上 往牆移動的geosphere去撞擊地磚(box) 時間上吻合龜派器攻擊發的時間. 要讓geosphere接觸到box才可
20. 選所有box sphere 然後建立rigidbody.
21. 選RBCollection01. 設定質量. 確定geosphere是unyielding.
22. 現在可以進行模擬
小技巧: 改變mass friction gravity或是你可以再建立一個wind
注意: 如果運算不穩定 Reactor/world col.tolerence 可以調低一點 (約0.7)
龜派氣功
23. 非常簡單. 建立geosphere與cylinder. 隨時間改變高度. 最後龜派氣功會消失 我把半徑改為0即可.
(如果你的氣功在0-100 frmaes 在第100 frame消失. 在第100時設定半徑為零 然後在第98 frame設定為100% 這樣就可以迅速消失了)
小技巧: 可以再給cylinder一個taper modifier
其他動作
很簡單不寫啦
24. 完成 把所有元件拼裝起來即可.
[相關連結]
克林的氣元斬!(教學影片)
本教學英文版
(七龍珠與龜派氣功屬於其公司產品 若有侵犯著作權 會立即移除本網頁)
[教學]全部用完...怎麼讓材質球的材質「全部更新」砍掉舊的材質?
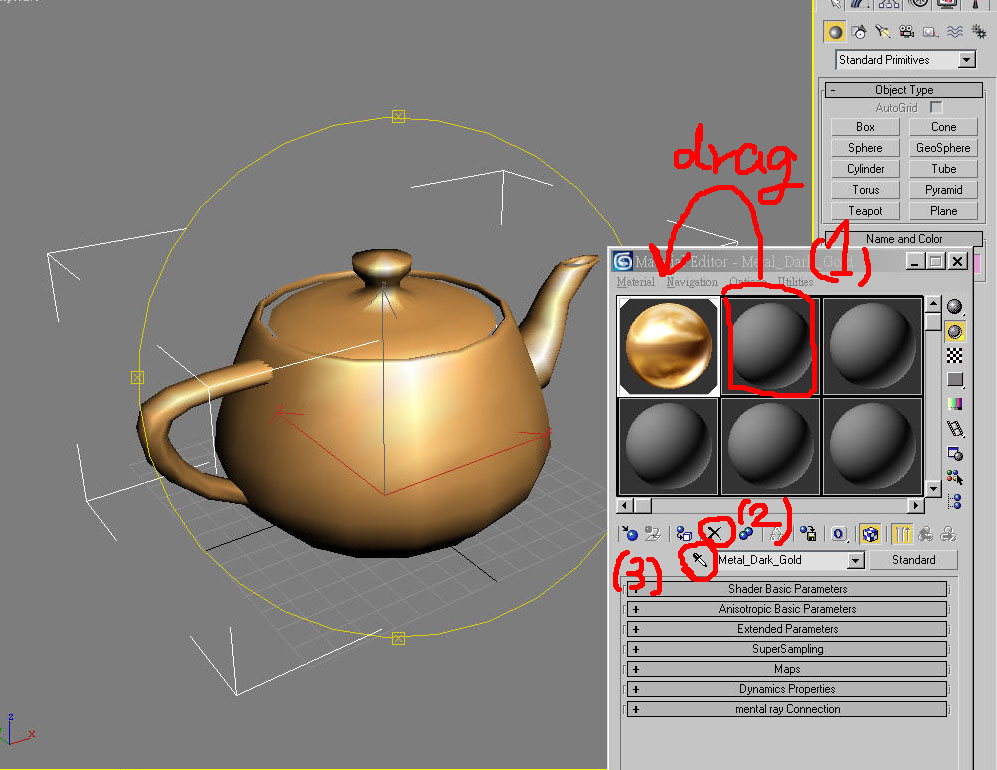 完全重設定材質 最快的方法就是拖曳灰色的材質給原材質 如步驟(1)
或是直接用(x)把材質球刪除 如步驟(2)
會擔心材質在場景中消失嗎? 不用擔心 其實材質並沒有被刪除 先選取一個空白材質 然後用滴管吸取場景中的物體(如茶壺) 這樣材質又回來了 如步驟(3)
還有一個方法就是選Material type按鈕 選Standard亦可
2006/08/13
[tutor]Kamehameha! Dragonball-like effect by using Reactor and Ragdoll Maxscript

See the final result in GIF please click here
See the final full video click here
[Related post]
faking human motion with ragdoll maxscript (Very Hot!)
AI implant Quickstart (simple crowd simulation)
Crowd simulation (biped) with AI implant (New!)
Crabs and Taiwan (by using CAT plugin)
This is my second 3ds max tutorial in English. Hope you like this tutorial and feel free to make comments, thank you!
This tutorial is not for very beginner in 3ds max, if you have experiments with character studio or 3ds max Reactor, it will be easier to understand.
Dragonball is a very famous Manga on earth, the author is Akira Toriyama (鳥山 明). I like Dragonball and Dr. Slump (another Manga by 鳥山 明) very much, so I decided to make a short video shows Dragonball-like, the "Kamehame-ha!"(or chi) in this tutorials by using 3ds Max Reactor and Ragdoll Maxscript.
P.S: some "Kamehame-ha!" videos on Your tube:
1. The Original Kame Hame
2. Goku releases the Kamehameha
3. Das Finale des 23. Tenkaichi Budokai Turniers (Teil 3)
Although default 3ds max have Ragdoll Maxscript in script folder, but it has some bug, better use this version of ragdoll script. There is a thread discuss about this script in CGTALK. After download the new version off ragdollscript, you can move it to your 3ds max script folder.
In the beginning, I want to make this video render with GI, but as you can see, this tutorial needs lots of tiles (thousands) which mean huge amount of poly-count. My PC is two years old don't have enough power to run it...so..I simplified/optimize some in the scene and render only with "Preview". I only focus on character motions and the flying tiles.
The video was made by several separated setup scenes, I rendered them and edited in Adobe premiere. The scene contain two characters one is attacker (A) and another is defender (B).
clip sequences
(1)the A attack B, and B defended and not hurt.
(2)the B run to A...
(3)the A re attack with deadly attack...
(4)the B....dead.
So let's get start:
I create several elements separately then put together, in this way the animation is much easier to handle. For the defender (B) character, I created there motion files (bip files) for him: defence with his arm-cross, run and "knock out by A and hit the wall".
Character motion file
run
(If you want to use your own run motion, you can skip those steps)
 1. create a character (for character B) for about 170 high, type: male
2. create a scenes like so: a big plan for the ground, a wall(box).
2.5 select B and go to motion panel: Turn on motion flow mode, go to motion flow/show graph
3. create clip, load your loop-able run clip. Click on the "create transition..." button then clip on the clip you just create.
4. go to motion, click on the define script button then go back to motion flow graph, click on the clip you create in step 3 for about there times (this will create several run motion for B)
5. Change transition value: first select your transition, go to motion flow panel/ edit transition button. Change transition length to zero, change Source clip start to the end frame (ie: from 10 to 17). Save motion file with bip format. this step make your run clips merge seamlessly.
Tip: you need to consider position, distance before you start.
knock out by A and hit the wall
6. continue. select you character B bones in running. go to motion panel: turn off motion flow then go to copy and paste. Click on copy posture button and save it.
7. now create another character with same height (170). Load the posture you just create. Adjust character position in the scene.
8. select the biped, go to script/run script: select ragdoll script(rctRagdollScript_Xpanded.ms). Pop-out UI: Constrain Humanoid
 The character B is actually move backward to hit the wall by him self, not by the attacker Kamehame-like attack.
9. Turn on auto-key. Use Body horizontal move tool to move your biped for some distance, set a key. (This will give your biped some momentum to run the reactor physique simulation)
Tip: move biped upward a little, this will make the result better.
9.5 select the RBCollection01 object, add your plane and wall.
10. Set mass: select wall set it mass, friction...same procedure to the plane and your biped bone.
Note: the plane simulation geometry have to set to Concave mesh! Both Wall and plane have check "unyielding"
11. Go to utility reactor: Preview and animation. Set the start Frame to within the biped movement in step 9 (ie: move from 0-25, the you can set start frame from 23)
12. Run preview. If you don't like the result, go back to step 9-11, change parameters. If it is good, the run create animation (turn on reduce key) and save your biped motion to bip format.
defence with arm-cross
13. Create a biped.
 14. Turn auto-key. select biped left (or right) Foot. go to motion panel, set planted key. Now use body vertical button to change the biped, to a bending leg (lower center of mass)
15. Posing your character with arm-cross.
Tip: every time you change posture, turn on autokey, set biped foot planted key again.
16. Now move the time-slider, move your biped backward. set the same key in the first frame.
Note: you have to set a free key for the foot first before you move backward.
17. save your biped file
Tip: check "Segment.....", this will avoid problem.
Tile flying effect
you are going to creat lots of tiles (box), thousands...reduce them if you have to. In this part, optimizing is everything.
The flying tiles is ascually hit by a hidden geosphere beneth the plane ground, not by the kamehameha-like chi
18. Create small boxes over the plane but do not touch the plane. (I create a 3*80 array of tile in the middle of the plane for reactor simulation and on the right and left side create 20*80 array of tile just a dummy object not involve in physique calculation.)
Tip: randomly delete some tiles will give more realism
19. Create a moving geosphere under the plane. The timing should match your flying character...and the sphere should touch the tiles box.
20 select the RBCollection01 object, add your plane and wall and the tiles (box)
21. Set the mass of geosphere. Check unyielding.
22. Now you can run reactor simulation to see the result.
Tip: you can adjust the friction, mass, gravity or even create a wind...
Note: in Reactor/world col.tolerence, if your simulation unstable you can set the value lower (about 0.7)
Kamehame-like chi itself:
23. Very very simple. Just a geosphere and a Cylinder. I change the high of the cylinder over time... In the end the chi disappear...I just change the radius value to zero.
Tip: Lets say your chi run from 0-100 frames. It disappear at 100 frame. set a zero radius value at 100 frame and before a few frame (ie: 98) set the value to 100%. This will ensure your Kamehame-like chi disappear very soon.
Tip: add a taper modifier to the cylinder give more effect.
Others:
Others motion are quiet easy and simple.
24. Complete. Now you can put them together in one scene and Run "make preview" or normal rendering.
(Kamehameha or Dragonball belong to their company, if the owner don't want me to show this tutorial, I will remove it right away)
[link] faking human motion with ragdoll maxscript (video! )
[link] Kienzan! Dragonball-like effect part 2(video!)
[チュートリアル]かめはめ波ッー! Dragball style by using Ragdoll

Hi
Japanese friends, sorry for inconvenience. This チュートリアル now only have English version and Traditional Chinese (Taiwan) version.
GIF画像 リンカ
ビデオ
2006/08/12
[チュートリアル]弾むおっぱい by using Blubber Maxscript
Hi
Japanese friends, this チュートリアル now only have English verion and Traditional Chinese version.
GIF画像 リンカ
My Japanese is very poor. Please help me (e-mail me) to translate into Japan language. 感謝!
もっとチュートリアル
[リンク] 台湾包子 by using 3ds max
[リンク] インスタント えぞ by using 3ds max
Japanese friends, this チュートリアル now only have English verion and Traditional Chinese version.
GIF画像 リンカ
My Japanese is very poor. Please help me (e-mail me) to translate into Japan language. 感謝!
もっとチュートリアル
[リンク] 台湾包子 by using 3ds max
[リンク] インスタント えぞ by using 3ds max
Subscribe to:
Posts (Atom)