 See the final result click HERE.
 This tutorial is write for those who use max version 6,7 but not 8 or 9. In max 8 and 9 have cloth modifier, but in 3ds max 7, all you got is the Reactor cloth modifier. To make a cloth like flag is very easy, but making good topology for the cloth object, you need some tricks---Delaunay triangulation.
 Definition of Delaunay triangulation (in German)
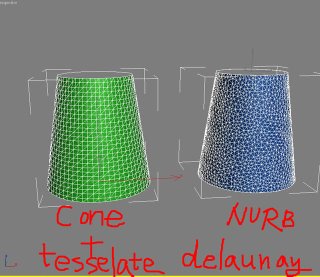
As you can see, compare with cone + Tessellation, the NURBS surface with delaunay option, the delaunay shows more random but evenly distribution of triangles. The standard object like cone is too even for their vertex, which is not good for cloth simulation.
Again, this tutorial is not for very beginners. If you have experiment with Reactor, it will be easier to understand.
Let's get start:
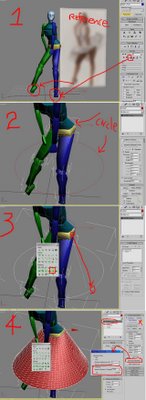
 1. posing your character: create a female type of character by using character studio. Load up a reference image in your scene. Now just posing...take some time.
Tip: before you posing, you need to make planted key for both foot, therefore, it will be easier to change the center of mass.
2. Create one circle and copy it upward like so.
3. Convert one circle to NURBS, attach another circle, use the "u" tool to create surface from the two circle.
4. Now, time to change the topology of your skirt model. Go to Surface Approx. , Turn off lock, Go to advanced Parameter: change type to Delaunay.
Tip: Change the "Spacial and curvature/ edge" lower will make the vertex denser.
5. The good triangulation of the skirt result (with Delaunay). However, there is a seam.
6. Select the vertex and wild the seam
 7. Apply a Reactor cloth modifier. select those vertex and fix it.
8. Create cloth collection. Create two Wind object. Now you can test the simulation.
Tip: make a rigidbody for the thigh or calf and hand you like.
9. Change the color of character bone to skin color as I did....if you like to. Hair is a simple Hydra. Eyes and lips are lines.
I hope you like this tutorial, thank you for visiting CG Taiwaner.
Software: 3ds max 7, Finalrender stage-1
related topic
[link]breasts bounce simulation by using blubber 1.0 Maxscript
[link]faking human motion with ragdoll maxscript (video!)
Off-topic
China officals grabbed Taiwan's flag during ICG

No comments:
Post a Comment