應該是玩家自製的廣告 SONY過分重視技術 忘了game play遊戲的本質. 雖然這是在諷刺PS3 但是在3D動畫產業 所有的動畫師都該知道: 不要過度執著於新的技術 新的外掛 內容才是最重要的!
來源: 點這裡

2006/11/12
2006/11/09
[tutor][video]Making of modern tap (NURBS)
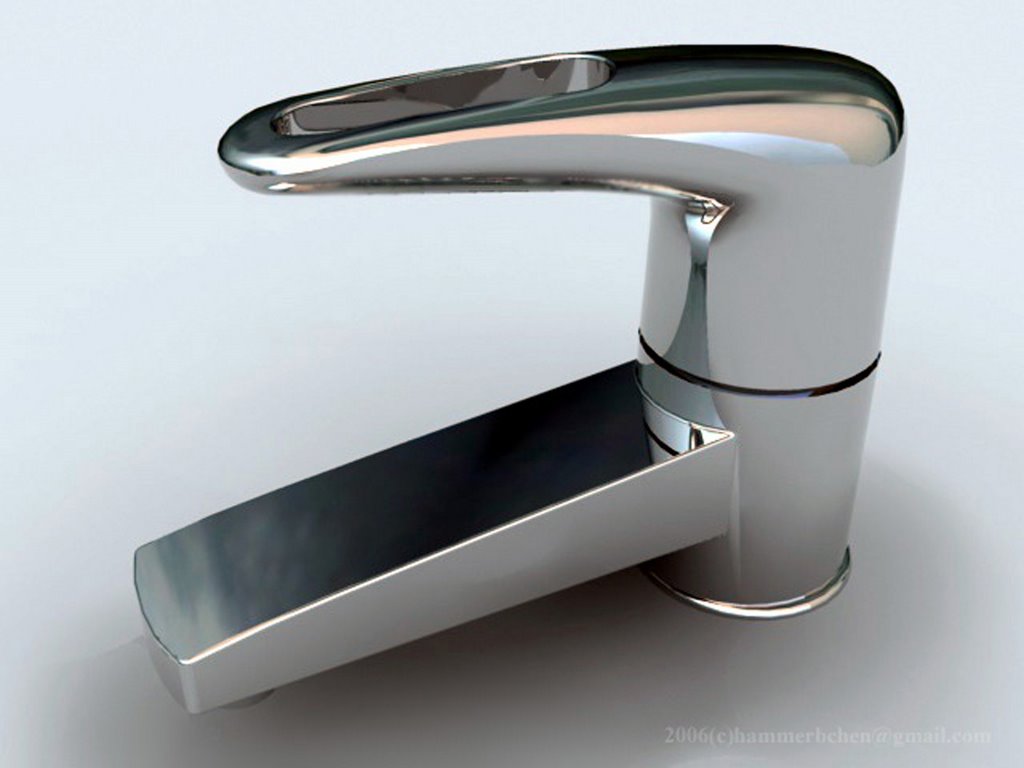
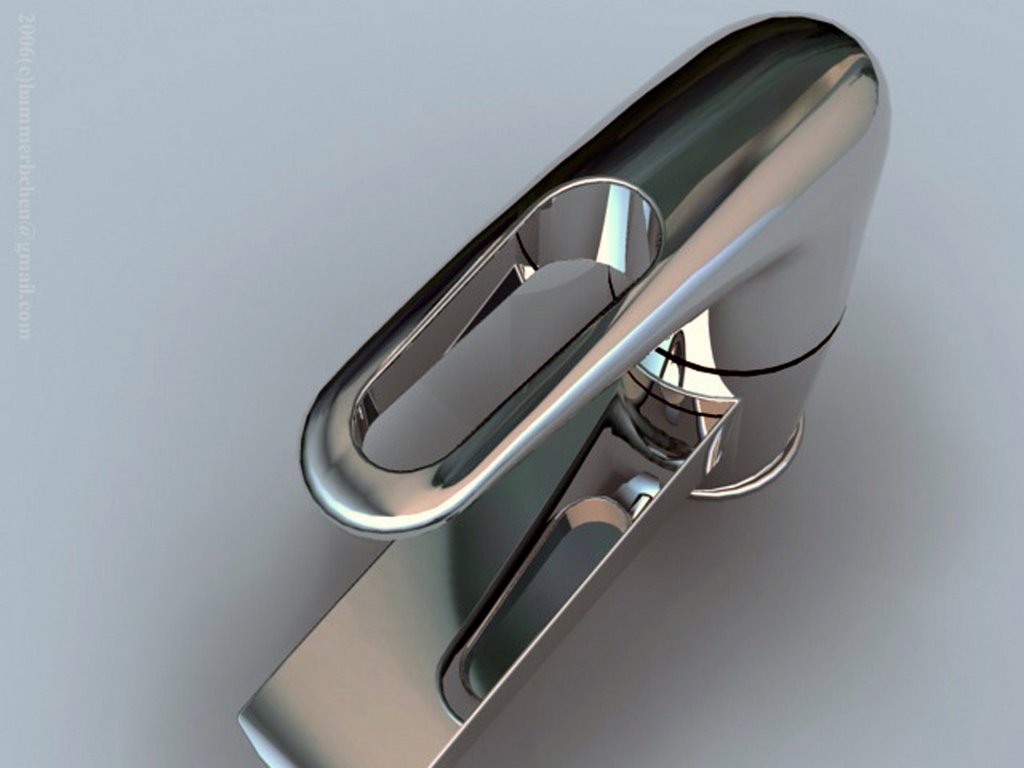

In free video tutorial you will learn how to model a modern tap, advaned NURBS modeling. After modeling, you will learn how to make material for the tap by using Cebas finalrender metal material and render with HDRI lighting. Please note you need npower Power NURBS plugin to make this model.
Video tutorial (running time:59mins, split into 3 videos)
01
02
03
More tutorials:
breasts bounce simulation by using blubber 1.0 Maxscript (hot!)
Kamehameha! Dragonball-like effect by using Reactor and Ragdoll Maxscript
Marilyn Monroe-style blow skirt---tips when working with Reactor Cloth
faking human motion with ragdoll maxscript (hot!)
Modeling with Reactor
Ultra fast female modeling with Character Studio
Kienzan! Dragonball-like effect part 2
Ultra-Fast series: texturing a female model
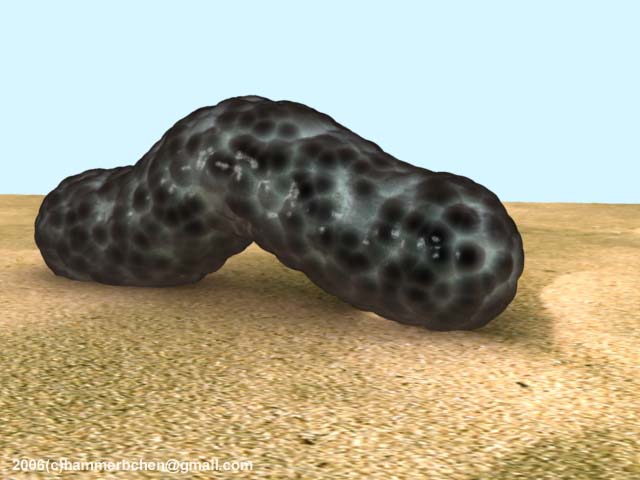
Modeling a croissant
Ultra-Fast series:rigging a female character
Making of Lee Teng-hui
2006/11/07
[tutor][video]NURBS a car: part 1 bonnet (hood)

Hi all
Welcome to CG Taiwaner. I am thinking to make a series of video tutorial to demo you how to model a car with NURBS in 3ds max. This will be totally free and must important of all: no plugin needed!
In this video tutorial you will learn how to model a bonnet with NURBS function in 3ds max.
Video tutorial (running time: 18mins)
2006/11/06
[tutor][video]NURBS modeling a hair dryer
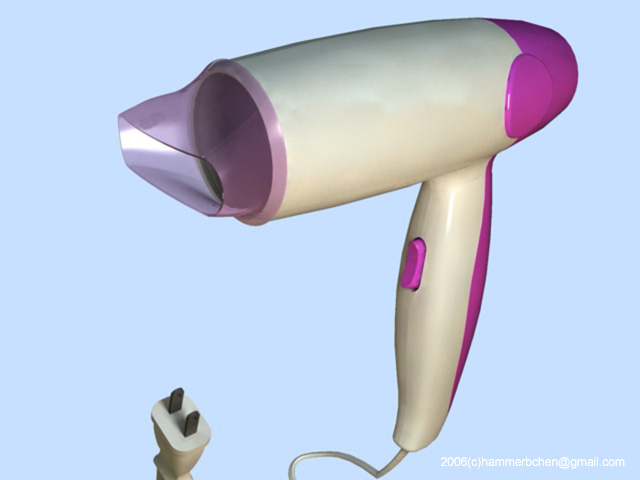
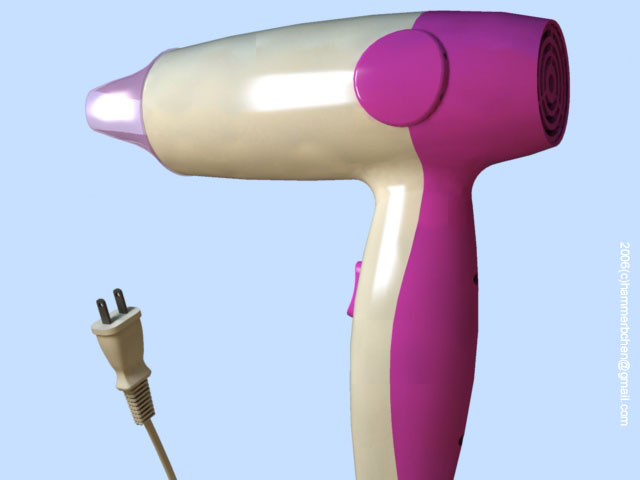
In this free video tutorial you will learn how to model a hair dryer with nPower NURBS plugin in 3ds max. If you don't have npower NURBS, click HERE to get a demo version of it.
Video tutorial (running time: 107mins, split into 5 videos)
01
02
03
04
05
2006/11/03
[video][tutor]Modeling a shell of mobile phone

This video tutors demo you how to model a shell of mobile phone, intermediate NURBS modeling. Please note you need npower Power NURBS plugin to make this model. I will make a more detailed mobile phone and its video tutor later.
Video tutorial (total 64mins long, split into 3 videos)
01
02
03
More tutorials:
breasts bounce simulation by using blubber 1.0 Maxscript (hot!)
Kamehameha! Dragonball-like effect by using Reactor and Ragdoll Maxscript
Marilyn Monroe-style blow skirt---tips when working with Reactor Cloth
faking human motion with ragdoll maxscript (hot!)
Modeling with Reactor
Ultra fast female modeling with Character Studio
Kienzan! Dragonball-like effect part 2
Ultra-Fast series: texturing a female model
Modeling a croissant
Ultra-Fast series:rigging a female character
2006/11/02
[tutor][video]NURBS modeling a dual blade shaver

This video tutors demo you how to model a shaver, intermediate NURBS modeling. No extra plugin needed to model this in 3ds max!
Video tutorial (total 27mins long)
2006/10/31
[教學][影片] NURBS建模教學套餐 tutors set
 建模是我最弱的一環 尤其是NURBS 由於市面上3ds max書籍關於NURBS建模很少 例子也太過簡單 多流於介面說明 所以我參考其他的CAD軟體書籍 把一些工業設計常見的專題 以3ds max軟體來建立 希望嘉惠3ds max的使用者. 教學1~4不需要任何外掛. 5與6需要nPower Power NURBS外掛軟體操作. 你可以到官方網站下載試用版. 3ds max的NURBS經常令人詬病 除了太陽春之外 無法用NURBS操作boolean, 另外其fillet指令也不容易使用 原本我想用Rhino 3D來建模 但是後來發現Power NURBS的外掛就能完全取代Rhino 3D同時又能在3ds max環境下使用 值得推薦.
教學影片1 吸入式渦卷泵 volute pump
教學影片2 鉤子 hook
教學影片3 葉輪 turbine
教學影片4 洗潔劑的瓶子 bottle of laundry detergent
教學影片5 寶特瓶 PET bottle
教學影片6 水龍頭 Tap
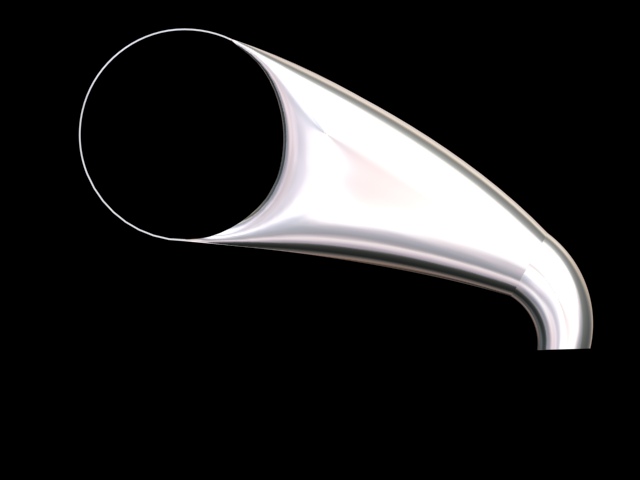
[tutor][video]NURBS modeling a tap


This video tutors demo you how to model a tap, advaned NURBS modeling. Please note you need npower Power NURBS plugin to make this model. This plugin is very good at NURBS modeling, especially the fillet fuction whicth is very bad in default NURBS function in 3ds max.
Video tutorials (total 73mins, split into 4 videos)
01
02
03
04
More video tutorials:
Modeling a shell of mobile phone
lights in a spaghetti restaurant
breasts bounce simulation by using blubber 1.0 Maxscript
Modeling with Reactor
2006/10/30
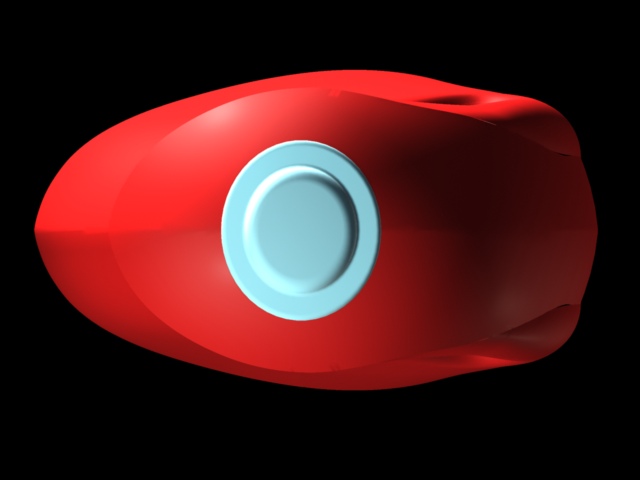
[video][tutor]NURBS modeling a PET bottle
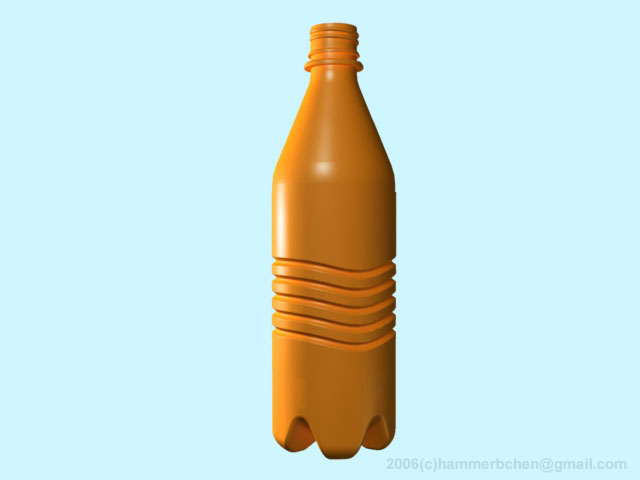

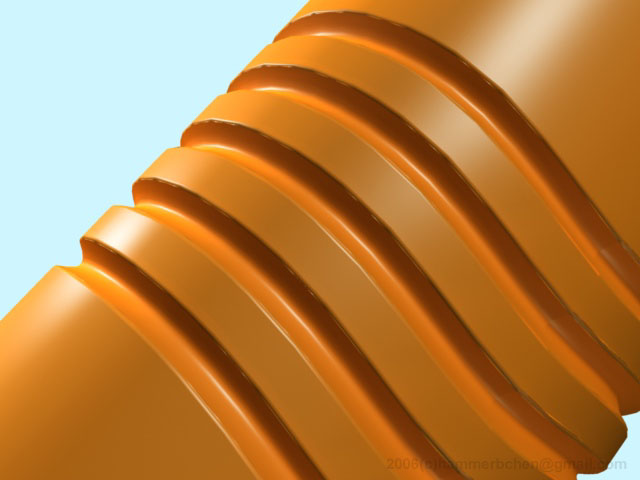

This video tutors demo you how to model PET bottle,advaned NURBS modeling. Please note you need npower Power NURBS plugin to make this model.
npower website click HERE
Description of this tutor:
In this video tutor I combine NURBS fuction in 3ds max and use the npower power NURBS plugin to perform some task during modeling this PET bottle. I take advange of the "Xcurve" function in power NURBS to make the wave pattern of this bottle. For the bottom of this bottle, I use the powerbollean to cut out the shape and fillet the it.
It seems that npower power NURBS has bug, so I am stick with default NURBS in 3ds max, until some task can not be done by default NURBS.
Tips: the cut out the shape of wave pattern, better check the "cap" fuction after you revolve the cure for the middle part of the bottle.
Video tutorial (total 54mins, split into 3 videos)
01
02
03
More free 3ds max tutorials:
breasts bounce simulation by using blubber 1.0 Maxscript (hot!)
Kamehameha! Dragonball-like effect by using Reactor and Ragdoll Maxscript
Marilyn Monroe-style blow skirt---tips when working with Reactor Cloth
faking human motion with ragdoll maxscript (hot!)
Modeling with Reactor
Ultra fast female modeling with Character Studio
Kienzan! Dragonball-like effect part 2
Ultra-Fast series: texturing a female model
Modeling a croissant
Ultra-Fast series:rigging a female character
2006/10/28
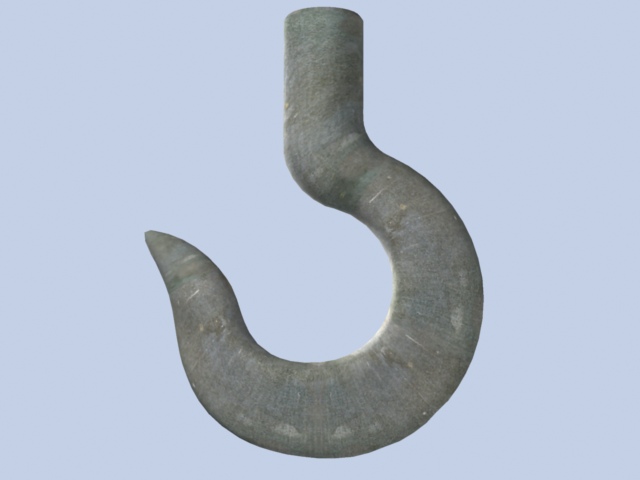
[video][tutor]NURBS modeling a hook

*** Donate to CG Taiwaner ***
In this video tutor you will learn basic NURBS to model a hook.
Description of this tutor:
(1) create shapes and corss-section of the hook
(2) convert to NURBS, join the curves
(3) By using "create 2-rail sweep" to crete surface for the hook
Tips: play around with "reverse curve" and change posion of start point of the cross-section curves to get better result
Video tutorial (Total 28mins)
01
02
2006/10/24
[video][tutor]Modeling body of a volute pump

*** Donate to CG Taiwaner ***
In this very simple video tutor you will learn basic NURBS to model a body of a volute pump.
Videos tutorial (Total 31mins, split into 2 videos)
01
02
Related topics:
Modeling a bottle of laundry detergent (Hot!)
Modeling a turbine (impeller)
2006/10/23
[tutor][video]Modeling a bottle of laundry detergent
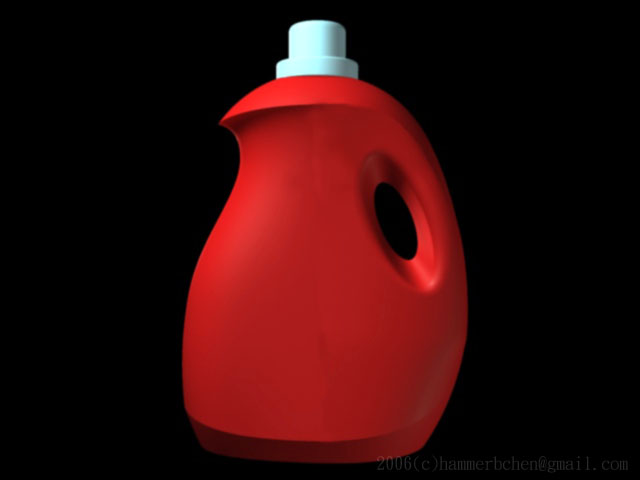
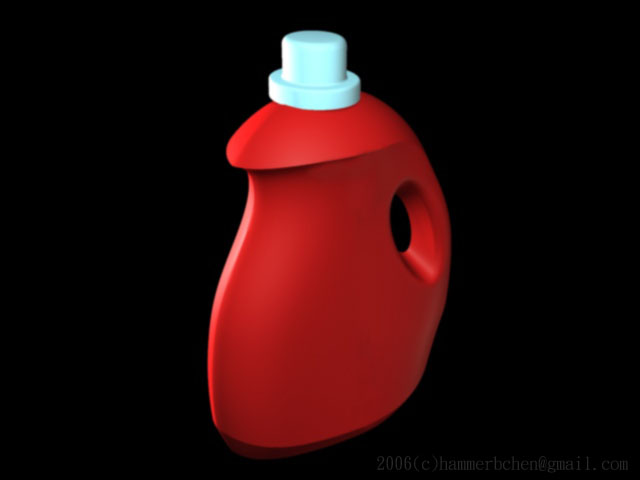
This video tutors demo you how to model a bottle of laundry detergent, advanced NURBS modeling.
Video tutorial (total 47mins, split into 3 videos)
01
02
03
Related topics
Modeling a turbine (impeller)
Modeling body of a volute pump
More tutorials on CG Taiwaner:
Modeling a croissant
Sparkler writing in 3ds max (Hot!)
faking human motion with ragdoll maxscript
2006/10/20
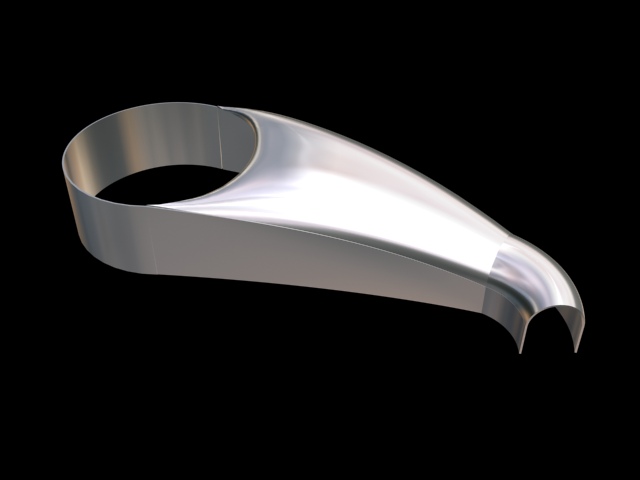
[video][tutor]Modeling a turbine (impeller)
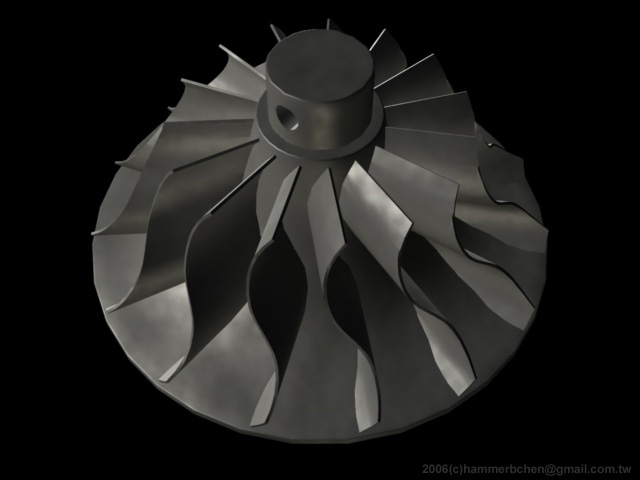
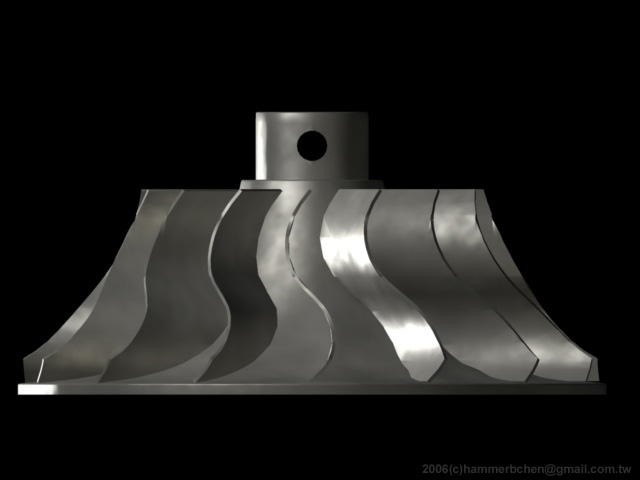

In this video tutor you will learn how to model a turbine in 3ds max, basic NURBS modeling.
Description: First create rectangles and circle, attach those shapes together. Trim the shapes. Convert to NURBS and lathe. Secondly, to create fans of the turbine, create curve, extrude the curve. Create another cureve and trim the extrude surface. Fix the capping problem by convert to mesh, go to vertex level, select all vertex and weld.
Video tutor (total 14 mins):
Related topics
Modeling body of a volute pump (NEW!)
Modeling a bottle of laundry detergent
2006/10/13
[資源]泰迪熊 用手畫建立3D模型 Teddy 3D Freeform

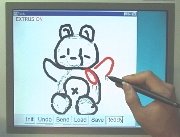
用手繪的方式建立3D Model 這個軟體叫做Teddy泰迪熊. 由東京大學Takeo Igarashi研發的.
官方網站 點這裡
操作的影片 點這裡
示範的影片 這裡可以下載
相信這10年內 建立3D模型會有越來越多的選擇 越來越人性化 直覺化 讓小朋友也可以玩3D
2006/10/03
[tutor][video]lights in a spaghetti restaurant
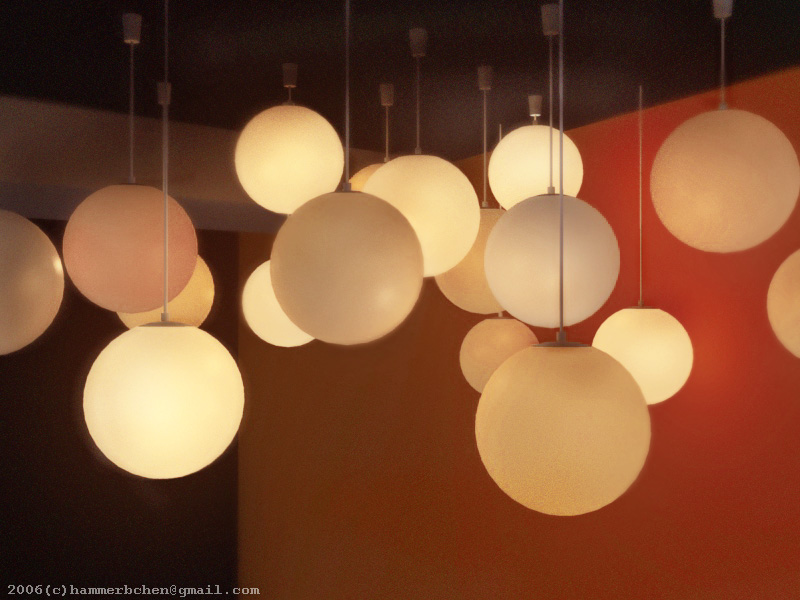 I recrete a photo I took in a spaghetti restaurant in Taipei. This is quiet simple scene both modeling and lighting, but need some tweak for position/brightness of those lights.
Software: 3ds max7, photoshop 5, Finalrender stage1
Video tutorial(23mins long, split into 2 videos):
01
02
More tutorials on CG Taiwaner:
Modeling a bottle of laundry detergent
AI implant Quickstart (simple crowd simulation) (New!)
[教學][影片] 義大利麵店的燈飾lights in a spaghetti restaurant
 義大利麵店的燈飾 原本是認為太簡單了 所以打算不寫教學. 簡單說明: 燈泡本身是用sphere做成 轉成poly後用splice切成上下兩部分 上面那部份detach成燈架. 其他燈價部份是用cylinder製成 非常簡單. 光源是用omini 給予不同的multiplier.
軟體: 3ds max7, photoshop 5, Finalrender stage1
教學影片(23分鐘, 分成兩集):
01
[video][tutor]Sea cucumber-like skin texture

2006/10/02
[video][tutor]Faking bath foam with displacement map

This video tutorial demo you how to fake a bath foam with cellular map. You can find some good image reference on flickr or istockphto.
I can not find any tutorial for making foams so I decided to make one. If you know any better way to make foams, please e-mail me.
Video tutorial (Total 18min long, split into 2 videos):
01
02
Material setup:

2006/09/29
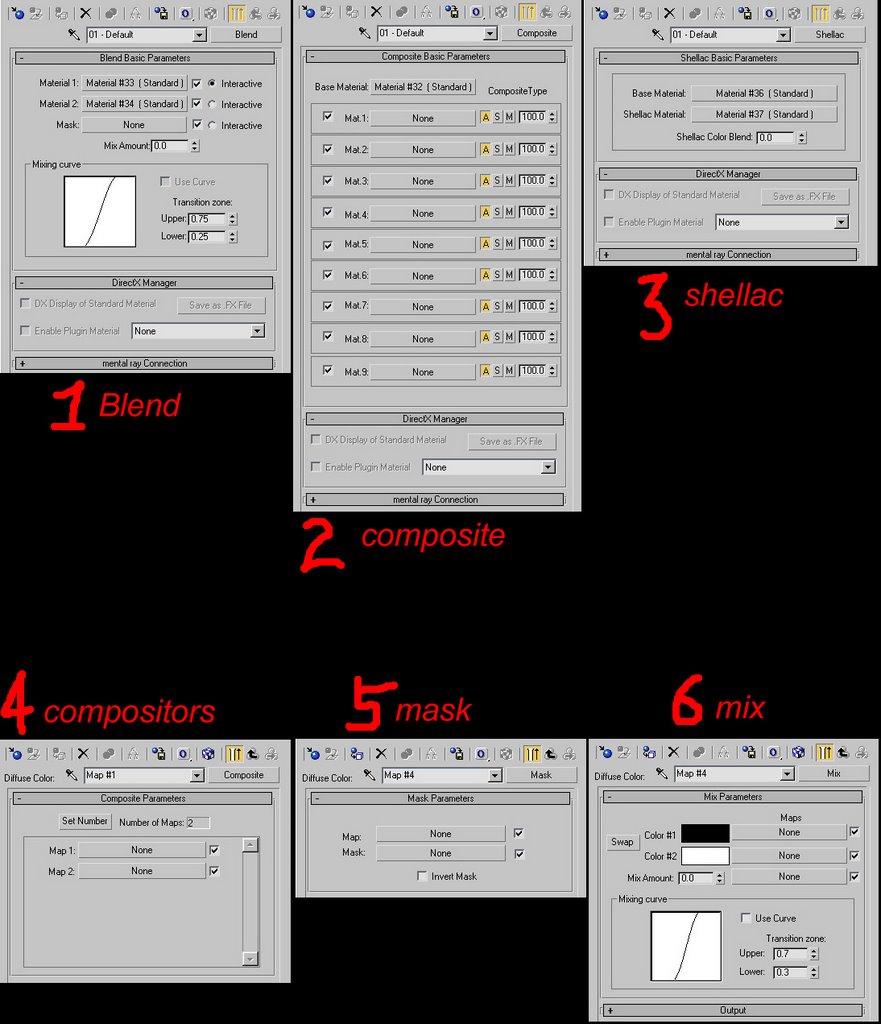
[筆記]弄懂材質--合成材質篇(composite)
3ds max當中有很多種材質與貼圖都與合成有關 名子也很像 容易混淆 這裡特別做比較說明:

1~3是材質material 4~6是貼圖map. 材質與貼圖的差異 前篇以介紹過了. 這六種材質/貼圖都與影像合成有關 如果弄懂了 應該對材質觀念有幫助.
首先是2與4非常像 compositor與composite 兩者都是合成的意思 不同的是一為貼圖 另一為材質. 解釋2的意義: 其base material就是底層材質的意思 其上的材質Mat1, Mat2...可以依序疊加. 這裡的Mat2等 一定要加上透明度(mask)這樣base的材質才會顯現 否則覆蓋過後只剩下mat2等疊加的材質能夠被看到. 合成的方式有a (addictive), s (substrative), m (mix)三種 這裡a的方式是最直觀的. 簡單的說就是 composite材質即為底層材質 然後疊加新的材質上去 (玩過photoshop的圖層就很容易理解).
材質的合成能夠建立像是 塑膠+玻璃等混合物體 然而貼圖的合成辦不到.
而4是compositor真的和2很像. 差別在於4適合成貼圖 而其map2的貼圖必須要有alpha等透明度設定(tif檔) 否則map2會把map1所覆蓋.
1blend材質 這裡mat1相當於base material 而mat2覆蓋上去, 由mask控制mat2的覆蓋程度 換句話說mask是加諸在map2之上的 如果mask當中是黑色 則材質顯露出mat1的樣子 而mask是白色 則顯示mat2的樣子.
與belnd很類似的是shellac材質 差別在於 shellac的材質base與shellac材質之間有上下之間的關係 而blend材質的mat1 與mat2是混合而已 沒有上下的關係.
5mask 這個貼圖通常不會單獨使用 (通常會與composie material搭配) 這裡map1 相當於之前介紹的map2貼圖 而mask是加諸於map1之上的 那你會問mask的base材質為何? 就是diffuse color而已. mask適合做為一物體上面貼貼紙的作業上.
6mix, 這個又和blend幾乎一模一樣了 差別就是一個為材質 一個為貼圖而已.
舉例:

想像一下你有三張投影片 一張印有綠樹 一張是紅蠟燭 一張是人群(黑色代表透明) 這裡你把綠樹放在底下(base) 疊上一張紅蠟燭 然後再用人群去遮蓋紅蠟燭 就會得到圖像3
如果改遮蓋程度為50% 就會得到圖像4
3ds max材質最難理解的就是合成 影像合成的概念也不過是如此.
[連結]弄懂材質--反射折射篇
[連結]3分鐘學會使用3ds max內建的全局照明
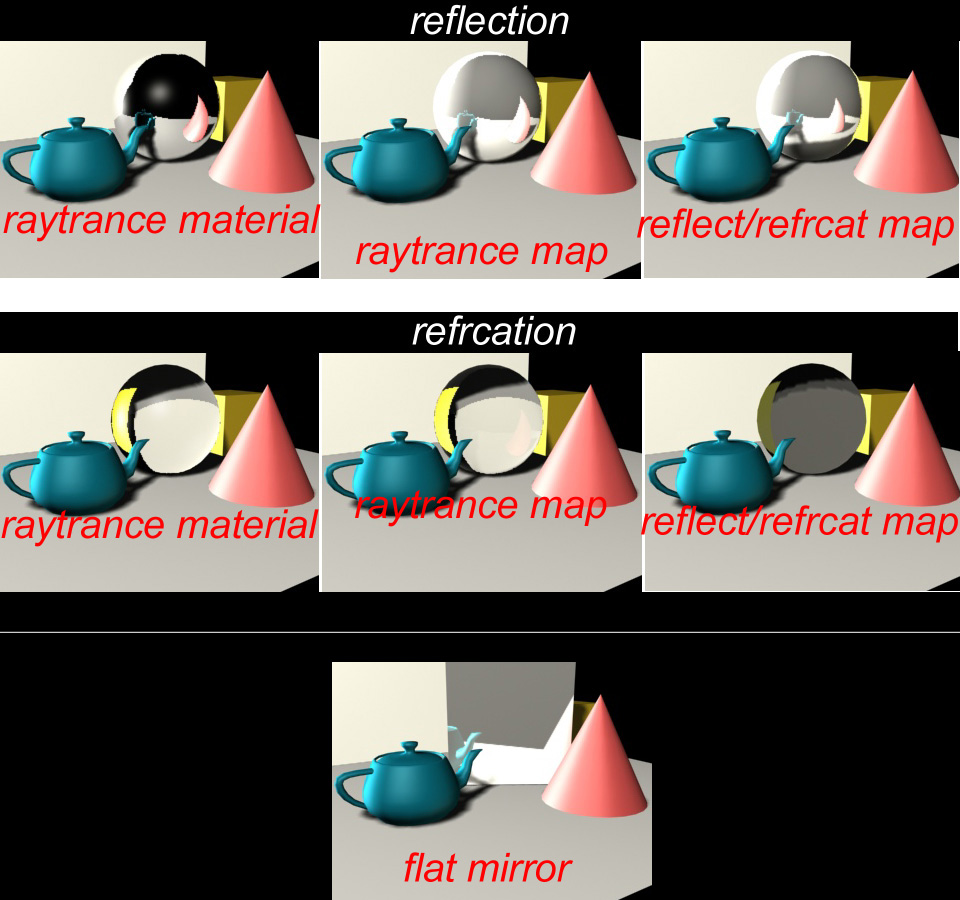
[筆記]弄懂材質--反射折射篇 reflect/refract material and map
想要徹底弄懂材質 於是打算做一系列的比較 藉由比較各種材質貼圖 徹底了解其參數的意義與限制. 在3ds max當中要建立反射 折射(reflect and refract)的材質 有很多種方法 這裡介紹至少有3種方式 7種結果. 可以用raytrance material與map來解決: 問題是到底什麼是材質(material) 與貼圖(map)呢?
我個人的理解是 材質如塑膠 金屬 玻璃等都算是材質. 在3ds max當中如果物體給予了玻璃材質 那個物體整體就是玻璃的材質. 而相對的貼圖而言 貼圖是一張圖片貼在物體表面 呈現出物體的樣子.
一個材質可能包含多種貼圖 但是一個貼圖就只能是某個材質 因為貼圖是材質的子集合. 簡單的說 貼圖是貼在材質之上的. 你可以用不同的材質建立不同性質的質感 例如混合塑膠與玻璃材質 但是你沒辦法混合塑膠與玻璃貼圖 建立兩種質感 因為貼圖就是貼圖 無法同時表現兩種質感.
想像一個圓柱體 你可以給予玻璃材質 那圓柱體看起來就會像是玻璃; 如果你不給予玻璃材質 而是利用像機去拍攝真的玻璃 然後把玻璃的影像印刷出來 把印刷的照片貼在那個圓柱體上 如此一來 乍看之下 那個貼有玻璃相片的圓柱體 看起來也像是玻璃了.
這就是貼圖與材質最大的差別. 簡單的說 貼圖可以算是一種取巧的方式. 跟玻璃材質比較 玻璃貼圖的方式是比較有效率多了 但是其結果卻是不夠真實.
再舉一個例子 室內裝潢有錢人就會用實心木板 沒錢的就用三合版. 三合版是用木屑擠壓成行的版子 外層可以貼圖(map) 看你是要花梨木 就貼花梨木的貼圖 要柚木就貼柚木的貼圖. 而實心木板就是直接用花梨木 或是柚木的木料. 三合板比實心木便宜許多 如果說三合板就是貼圖(map) 而實心木就是材質(material) 那也是很貼切 因為三合板比實心木便宜 而map也比material運算的快的多.
這裡比較三種方式建立反射/折射的效果
1. 用raytrance material 將reflect改為全白 這樣物體就會呈現反射
2. 用raytrance material 放置在refelct map 這樣物體就會呈現反射
3. 用reflect/refract map 放置在refelct map 這樣物體就會呈現反射
4. 用raytrance material 將transparency改為全白 這樣物體就會呈現折射(透明)
5. 用raytrance material 放置在refract map 這樣物體就會呈現折射(透明)
6. 用reflect/refract map 放置在refract map 這樣物體就會呈現折射(透明)
7. 最後一種方式 但是只能用在平面上 就是用flat mirror放置於refelct map
8. 補充: 若是要折射的話 還可以用thin wall reflection
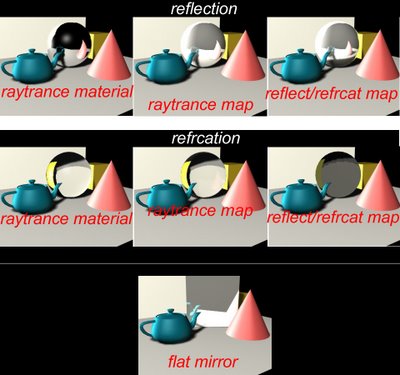
比較一下這些不同方式 可以看出raytrance material的效果是最好的 而用map方式呈現的反射或折射 結果會太白
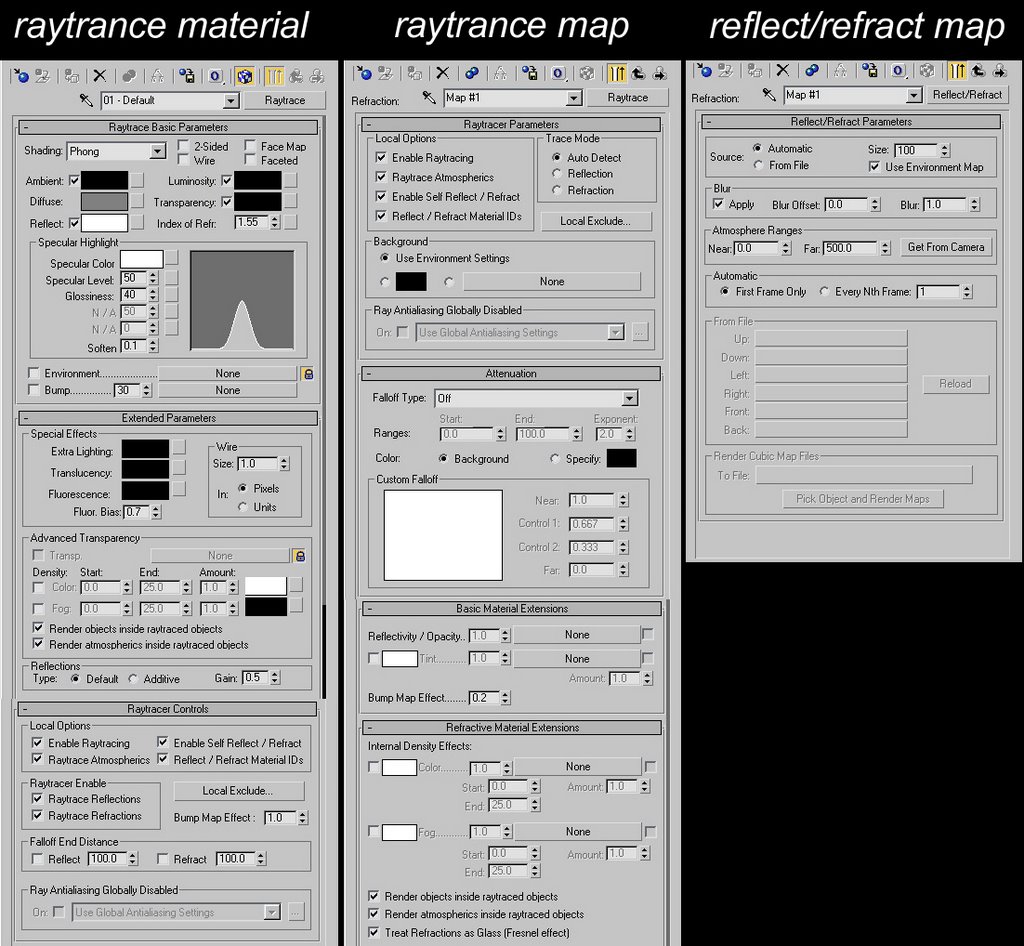
比較一下三種方式的介面:
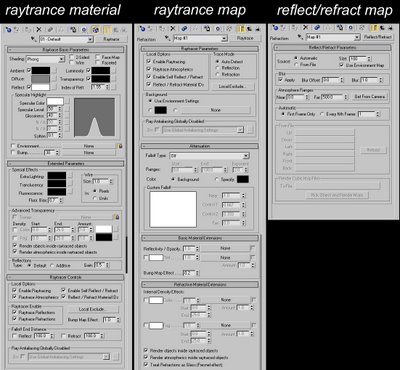
可以發現複雜度 是raytrance material>raytrance map>refelct/refract map
簡單說明一下: raytrance material有很多選項. 而raytrance map也不見得就比raytrance material差, 因為raytrance map具有attenuation的選項. 看看reflect/refrcat map介面相當簡單, 它的原理就是建立一個cubic map貼在物體的六面 產生折射與反射的錯覺 這裡size:100 就是指貼圖的解析度. 如果你不想即時建立cubic貼圖 可以事先建立六面貼圖, 軟體會運算所指定的物體 產生六張解析度為100*100的貼圖供你使用.
[連結]弄懂材質--合成材質篇
我個人的理解是 材質如塑膠 金屬 玻璃等都算是材質. 在3ds max當中如果物體給予了玻璃材質 那個物體整體就是玻璃的材質. 而相對的貼圖而言 貼圖是一張圖片貼在物體表面 呈現出物體的樣子.
一個材質可能包含多種貼圖 但是一個貼圖就只能是某個材質 因為貼圖是材質的子集合. 簡單的說 貼圖是貼在材質之上的. 你可以用不同的材質建立不同性質的質感 例如混合塑膠與玻璃材質 但是你沒辦法混合塑膠與玻璃貼圖 建立兩種質感 因為貼圖就是貼圖 無法同時表現兩種質感.
想像一個圓柱體 你可以給予玻璃材質 那圓柱體看起來就會像是玻璃; 如果你不給予玻璃材質 而是利用像機去拍攝真的玻璃 然後把玻璃的影像印刷出來 把印刷的照片貼在那個圓柱體上 如此一來 乍看之下 那個貼有玻璃相片的圓柱體 看起來也像是玻璃了.
這就是貼圖與材質最大的差別. 簡單的說 貼圖可以算是一種取巧的方式. 跟玻璃材質比較 玻璃貼圖的方式是比較有效率多了 但是其結果卻是不夠真實.
再舉一個例子 室內裝潢有錢人就會用實心木板 沒錢的就用三合版. 三合版是用木屑擠壓成行的版子 外層可以貼圖(map) 看你是要花梨木 就貼花梨木的貼圖 要柚木就貼柚木的貼圖. 而實心木板就是直接用花梨木 或是柚木的木料. 三合板比實心木便宜許多 如果說三合板就是貼圖(map) 而實心木就是材質(material) 那也是很貼切 因為三合板比實心木便宜 而map也比material運算的快的多.
這裡比較三種方式建立反射/折射的效果
1. 用raytrance material 將reflect改為全白 這樣物體就會呈現反射
2. 用raytrance material 放置在refelct map 這樣物體就會呈現反射
3. 用reflect/refract map 放置在refelct map 這樣物體就會呈現反射
4. 用raytrance material 將transparency改為全白 這樣物體就會呈現折射(透明)
5. 用raytrance material 放置在refract map 這樣物體就會呈現折射(透明)
6. 用reflect/refract map 放置在refract map 這樣物體就會呈現折射(透明)
7. 最後一種方式 但是只能用在平面上 就是用flat mirror放置於refelct map
8. 補充: 若是要折射的話 還可以用thin wall reflection
比較一下這些不同方式 可以看出raytrance material的效果是最好的 而用map方式呈現的反射或折射 結果會太白
比較一下三種方式的介面:
可以發現複雜度 是raytrance material>raytrance map>refelct/refract map
簡單說明一下: raytrance material有很多選項. 而raytrance map也不見得就比raytrance material差, 因為raytrance map具有attenuation的選項. 看看reflect/refrcat map介面相當簡單, 它的原理就是建立一個cubic map貼在物體的六面 產生折射與反射的錯覺 這裡size:100 就是指貼圖的解析度. 如果你不想即時建立cubic貼圖 可以事先建立六面貼圖, 軟體會運算所指定的物體 產生六張解析度為100*100的貼圖供你使用.
[連結]弄懂材質--合成材質篇
Subscribe to:
Posts (Atom)