
想要徹底弄懂材質 於是打算做一系列的比較 藉由比較各種材質貼圖 徹底了解其參數的意義與限制. 在3ds max當中要建立反射 折射(reflect and refract)的材質 有很多種方法 這裡介紹至少有3種方式 7種結果. 可以用raytrance material與map來解決: 問題是到底什麼是材質(material) 與貼圖(map)呢?
我個人的理解是 材質如塑膠 金屬 玻璃等都算是材質. 在3ds max當中如果物體給予了玻璃材質 那個物體整體就是玻璃的材質. 而相對的貼圖而言 貼圖是一張圖片貼在物體表面 呈現出物體的樣子.
一個材質可能包含多種貼圖 但是一個貼圖就只能是某個材質 因為貼圖是材質的子集合. 簡單的說 貼圖是貼在材質之上的. 你可以用不同的材質建立不同性質的質感 例如混合塑膠與玻璃材質 但是你沒辦法混合塑膠與玻璃貼圖 建立兩種質感 因為貼圖就是貼圖 無法同時表現兩種質感.
想像一個圓柱體 你可以給予玻璃材質 那圓柱體看起來就會像是玻璃; 如果你不給予玻璃材質 而是利用像機去拍攝真的玻璃 然後把玻璃的影像印刷出來 把印刷的照片貼在那個圓柱體上 如此一來 乍看之下 那個貼有玻璃相片的圓柱體 看起來也像是玻璃了.
這就是貼圖與材質最大的差別. 簡單的說 貼圖可以算是一種取巧的方式. 跟玻璃材質比較 玻璃貼圖的方式是比較有效率多了 但是其結果卻是不夠真實.
再舉一個例子 室內裝潢有錢人就會用實心木板 沒錢的就用三合版. 三合版是用木屑擠壓成行的版子 外層可以貼圖(map) 看你是要花梨木 就貼花梨木的貼圖 要柚木就貼柚木的貼圖. 而實心木板就是直接用花梨木 或是柚木的木料. 三合板比實心木便宜許多 如果說三合板就是貼圖(map) 而實心木就是材質(material) 那也是很貼切 因為三合板比實心木便宜 而map也比material運算的快的多.
這裡比較三種方式建立反射/折射的效果
1. 用raytrance material 將reflect改為全白 這樣物體就會呈現反射
2. 用raytrance material 放置在refelct map 這樣物體就會呈現反射
3. 用reflect/refract map 放置在refelct map 這樣物體就會呈現反射
4. 用raytrance material 將transparency改為全白 這樣物體就會呈現折射(透明)
5. 用raytrance material 放置在refract map 這樣物體就會呈現折射(透明)
6. 用reflect/refract map 放置在refract map 這樣物體就會呈現折射(透明)
7. 最後一種方式 但是只能用在平面上 就是用flat mirror放置於refelct map
8. 補充: 若是要折射的話 還可以用thin wall reflection
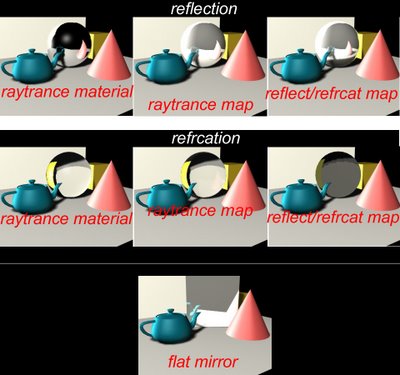
比較一下這些不同方式 可以看出raytrance material的效果是最好的 而用map方式呈現的反射或折射 結果會太白
比較一下三種方式的介面:
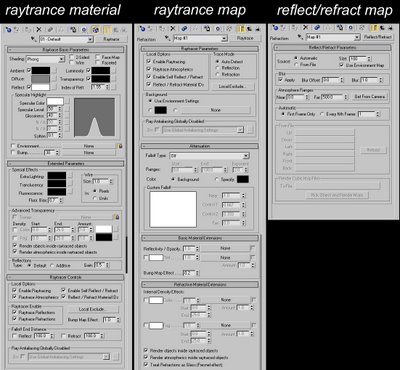
可以發現複雜度 是raytrance material>raytrance map>refelct/refract map
簡單說明一下: raytrance material有很多選項. 而raytrance map也不見得就比raytrance material差, 因為raytrance map具有attenuation的選項. 看看reflect/refrcat map介面相當簡單, 它的原理就是建立一個cubic map貼在物體的六面 產生折射與反射的錯覺 這裡size:100 就是指貼圖的解析度. 如果你不想即時建立cubic貼圖 可以事先建立六面貼圖, 軟體會運算所指定的物體 產生六張解析度為100*100的貼圖供你使用.
[連結]弄懂材質--合成材質篇
我個人的理解是 材質如塑膠 金屬 玻璃等都算是材質. 在3ds max當中如果物體給予了玻璃材質 那個物體整體就是玻璃的材質. 而相對的貼圖而言 貼圖是一張圖片貼在物體表面 呈現出物體的樣子.
一個材質可能包含多種貼圖 但是一個貼圖就只能是某個材質 因為貼圖是材質的子集合. 簡單的說 貼圖是貼在材質之上的. 你可以用不同的材質建立不同性質的質感 例如混合塑膠與玻璃材質 但是你沒辦法混合塑膠與玻璃貼圖 建立兩種質感 因為貼圖就是貼圖 無法同時表現兩種質感.
想像一個圓柱體 你可以給予玻璃材質 那圓柱體看起來就會像是玻璃; 如果你不給予玻璃材質 而是利用像機去拍攝真的玻璃 然後把玻璃的影像印刷出來 把印刷的照片貼在那個圓柱體上 如此一來 乍看之下 那個貼有玻璃相片的圓柱體 看起來也像是玻璃了.
這就是貼圖與材質最大的差別. 簡單的說 貼圖可以算是一種取巧的方式. 跟玻璃材質比較 玻璃貼圖的方式是比較有效率多了 但是其結果卻是不夠真實.
再舉一個例子 室內裝潢有錢人就會用實心木板 沒錢的就用三合版. 三合版是用木屑擠壓成行的版子 外層可以貼圖(map) 看你是要花梨木 就貼花梨木的貼圖 要柚木就貼柚木的貼圖. 而實心木板就是直接用花梨木 或是柚木的木料. 三合板比實心木便宜許多 如果說三合板就是貼圖(map) 而實心木就是材質(material) 那也是很貼切 因為三合板比實心木便宜 而map也比material運算的快的多.
這裡比較三種方式建立反射/折射的效果
1. 用raytrance material 將reflect改為全白 這樣物體就會呈現反射
2. 用raytrance material 放置在refelct map 這樣物體就會呈現反射
3. 用reflect/refract map 放置在refelct map 這樣物體就會呈現反射
4. 用raytrance material 將transparency改為全白 這樣物體就會呈現折射(透明)
5. 用raytrance material 放置在refract map 這樣物體就會呈現折射(透明)
6. 用reflect/refract map 放置在refract map 這樣物體就會呈現折射(透明)
7. 最後一種方式 但是只能用在平面上 就是用flat mirror放置於refelct map
8. 補充: 若是要折射的話 還可以用thin wall reflection
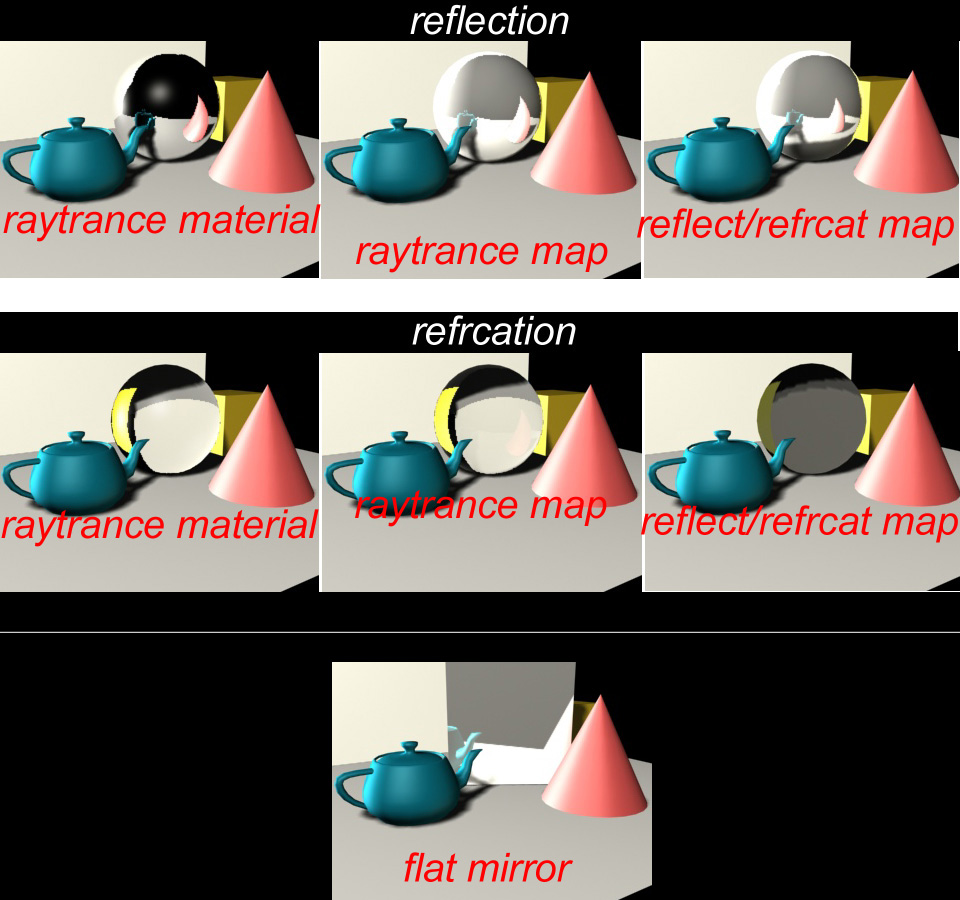
比較一下這些不同方式 可以看出raytrance material的效果是最好的 而用map方式呈現的反射或折射 結果會太白
比較一下三種方式的介面:
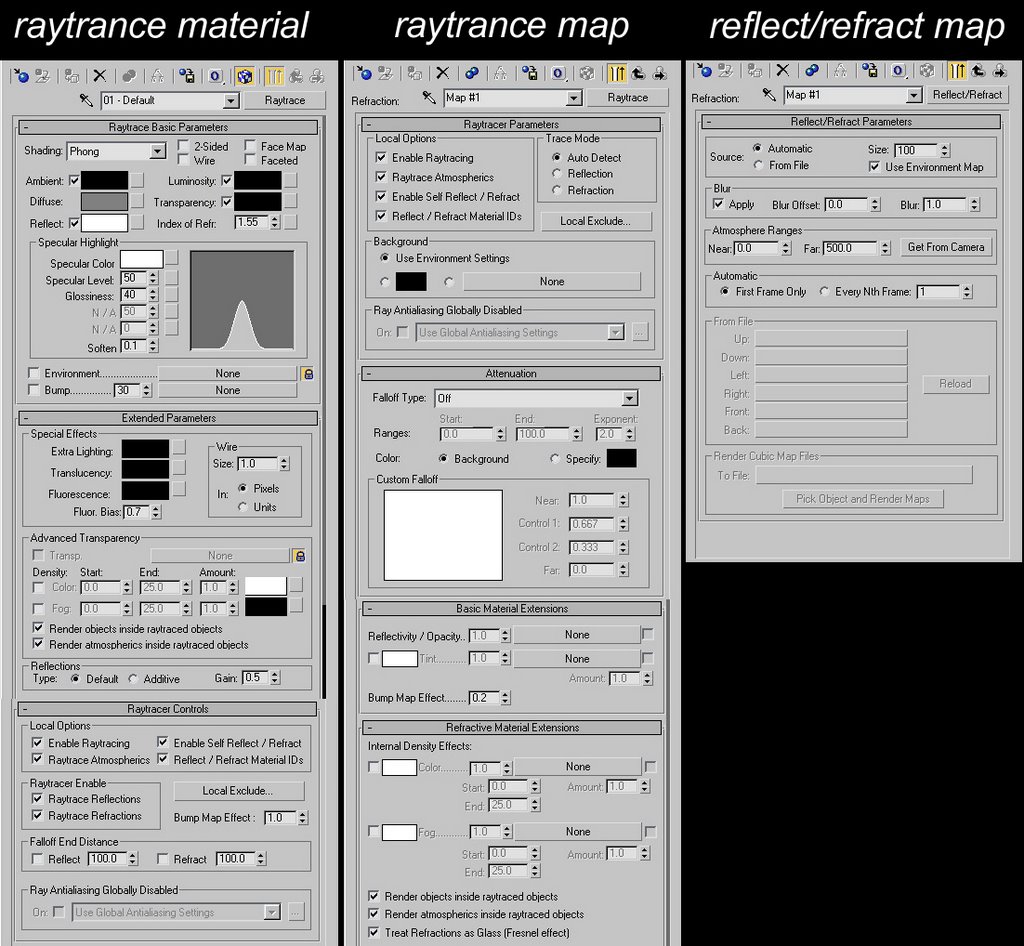
可以發現複雜度 是raytrance material>raytrance map>refelct/refract map
簡單說明一下: raytrance material有很多選項. 而raytrance map也不見得就比raytrance material差, 因為raytrance map具有attenuation的選項. 看看reflect/refrcat map介面相當簡單, 它的原理就是建立一個cubic map貼在物體的六面 產生折射與反射的錯覺 這裡size:100 就是指貼圖的解析度. 如果你不想即時建立cubic貼圖 可以事先建立六面貼圖, 軟體會運算所指定的物體 產生六張解析度為100*100的貼圖供你使用.
[連結]弄懂材質--合成材質篇


