
See final result please click
hereThis tutorial is intend to simulate a natural breasts bounce. You can apply to other part of body if want to.
As you know I am not a native English speaker, if you find any error or wrong English please e-mail me or make a comment in this thread.
This tutorial is not for very beginner in 3ds max, if you have experiments with character studio or morpher modifier, it will be easier to understand.
Blubber 1.0 maxscript is created by
Andy in
CGEmpire. This script is "
a simple tool for adding and controlling secondary motion using morph targets". Click
here to download the script.
Demo 1 and
Demo 2.
Very thanks Andy and CGEmpire for such useful tool. So let's get start:
Installation:
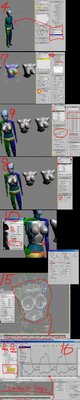
1. download the blubber 1.0 maxscript from CGEmpire. Unzip it and copy all the bitmap to 3ds max installation path folder "UI" (ie: C:\3dsmax6\UI)
2. start 3ds max (version 6, 7 or 8)
3. Go to Customize/Customize User Interface, click on Toolbar Tab: MainUI , Category and you will see "CGEmpire Tools" from pull-down menu. Now on the right hand, click the New to create a new toolbar then drag the "CGEmpire Tools icon" to the new toolbar you just created.
Now the blubber maxscript is fully installed.
You must have a breast model in this tutorial. You can create you own or download a free breasts model from Turbo Squid (You must register first to download). In this tutorial I use a breast model(lwo format) created by Tomwoof. If you want to use your own model, try not to use too complex or too low polygon model.Scene Setup
4. In max, create a character rig by using character studio.
Tip: create a Female body type model, this will make it easier when you rigging your breasts model.
5. import you breasts model, re size it to match the size of your character rig's breasts.
6. select the breasts model, hold down shift key and drag to create more there copy of the breasts model. Now you have 4 same models in your scene. Please rename them to : breast, breast-up, breast-left and breast-out.
The for models will be used for morpher targets. Now you have to modify your model that have the look of bounce up, bounce left and bounce out.
7. select the breast-up model, in Edit Mesh (or edit poly) mode, select its nipples, turn on soft selection, change the Falloff(value around 0.14) to select the breasts. Now use your move and rotate tool to modify your model so it looks like bouncing upward. Same procedure to the breast-left and breast-out model.
Tip: exaggerate the effect is recommended, you can fine-tune it latter on.
Bone and rigging
8. select the breast model and apply a physique modifier to it: click on "attach to Node" button then select bip01 (the one character you just create). Go to Sub-object level/envelope, select spline2 them adjust "Radio Scale" and "Parent, Child overlap" value to let the envelope fully cover the breast model. Move around your character to see if the rig works and no problem.
9. Setup the morpher: select the breast model and apply morpher modifier to it: Go to Sub-object level, load multiple targets. Select all other 3 breast model.
Tip: set the Global setting: Max=100 Min=-100 Limits. This will ensure your bounce breasts move move naturally.
10. Now time to use the Maxscript: Blubber 1.0. Select the breast model then click on the blubber button, pop-out the blubber user interface. Go to blubber bone/add blubber bone to create bone for your breast(it is a max dummy object). Move it to the position of the breast model and re size it to cover all the breast region.
11. In the pull-down menu of blubber: select blubber bone/select parentbone, select bip01 spline2. and in the Blubber Bone/Select TargetMesh, select your breast model.
12. Set the mass, stiffness and damping value of your breast. Set the there orientation (up, out and left) to its corresponding morph channel.
Tip: if your mass, stiffness and damping value already looks all right, change them seems to me won't have too obvious effect. As long as you not set the damping value to zero, this will make the breasts too old looking.
Note: Since this script work likes other physics simulation plug-in, remember to turn off "real time" and "loop" playback. When playing animation, the simulation will run and bake the motion data to your model. If the real time option turn on, you will see error results.
Every time you run the simulation, remember to click the "Go to start" button twice, and go to Blubber/update Scene. If you want to recalculate, select the breast model, delete all the key-frames.
So how to run simulation and baking the motion in your model? Just turn on auto key frame and Play animation, the blubber script will do the rest.
Simulation
13. Create animation to your character or load a motion capture file.
14. Select the breast model, go to morpher modifier so you can observe the morpher channel value changing in real time. Turn on auto key-frame then hit play animation...now the blubber run simulation, baking keyframes to your breast model. Observe the morpher channel value, if the value is higher than 100 or lower than -100, then its no good.
Tip: If the result is unnatural, you can change the scale value in blubber script UI.
15. Delete the blubber dummy (because the motion data has already baked into your model morpher modifier)
16. Select the breast model. Go to Graph Editor/ Track view Curve Editor, select "Morpher Modifier" then go to pull-down menu key/ reduce key to optimize the key-frames.
Tip: Best breast bounce curve should move around zero value [+/-] 80
17. Continue. Select different Morpher channel (up, out or left), select all keys and move it toward the zero value. Then Scale value to enhance the bounce effect around 80%.
18. Complete. Now you can render the animation to see the result.
Discussion threads
CGEmpire Forum, Blubber thread01. (Start by Andy---The Blubber script author)
CGEmpire Forum, Blubber thread02.Tutorial in Traditional ChineseDiscussion in HALLUCINO Forum (Japanese)
FX3D (Korea)
(New!)More free tutorials
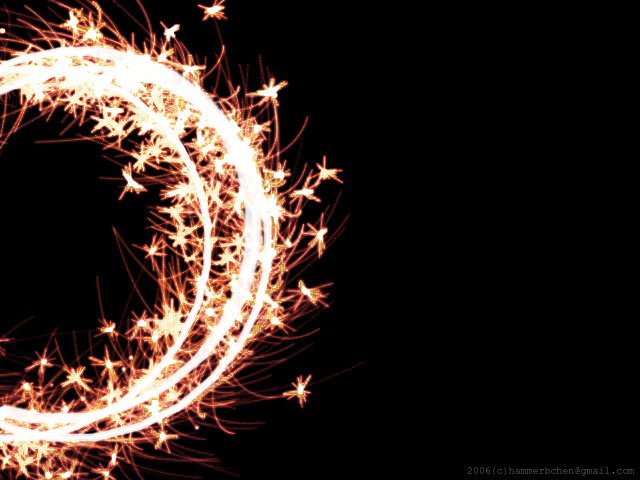
Marilyn Monroe-style blow skirtfaking human motion with ragdoll maxscript Kamehameha! Dragonball-like effect by using Reactor and Ragdoll Maxscript Marilyn Monroe-style blow skirt---tips when working with Reactor Cloth Sparkler writing in 3ds max with Trail 3.0 (Hot!)Food in Taiwan: A steamed bun (Taiwanese)
Quick Shrimp Modeling &Texturing (Taiwanese)
Hang death by using Reactor Rope + Ragdoll Maxscript (Taiwanese)
Off-topicChina officals grabbed Taiwan's flag during ICG


