V-Ray's VRayVolumeGrid allows you to load AUR or VDB files as volumetric data. However, proper shading settings are essential for achieving realistic cloud appearance and natural light scattering.
In the Smoke Color rollout of VRayVolumeGrid, you can find the Phase Function parameter, which controls how light scatters as it travels through the volume. To enable the Phase Function, set Scattering to Ray-traced.
Let’s consider two scenarios. First, a front-lit setup, where the camera and the sun are positioned on the same side of the volume. As you can see, setting the Phase Function to a positive value of 0.7 (Forward Scattering) produces the most realistic result. The default value, 0.0 (Isotropic Scattering), also produces a reasonable result in this setup. However, a Phase Function of -0.7 (Backward Scattering) makes the volume appear unrealistically dense and overly thick.
1. Waterline 吃水線的位置。當我們在以Phoenix FD Liquid Simulator模擬時,我們必須要知道Initial Fill-up到底要多高? 這個位置跟船的吃水線有關。比方說我們可以參考US NAVY DDG-51 USS Arleigh Burke這艘船的照片,看看吃水線到底在哪裡。一般在船體的塗裝,或是造型上會有點線索,我們可以知道吃水線的大致位置。
2. How many propelers 有多少螺旋槳,以及其位置。高品質的3D Ship model一般也會把水下的細節也做出來,也就是螺旋槳這類的細節。為什麼這個很重要? 因為船尾波(Ship wake)的很多細節跟螺旋槳所噴出的液體與氣體有絕大部分的關係。也就是說除了船體本身以外,我們必須要在水底下放置一個簡單的模型(ie: a box),將其設置為Liquid Source,噴出液體。因此知道這艘船到底有多少螺旋槳 高度 與位置很重要。
3. Speed 船速。我們不需要精確的速度,大概就可以了。船速一般會用Knots節,或是海浬為單位。因此我們只要知道船的平均是幾海浬就夠了。比方說25海浬或是30海浬。然後再換算成動畫常用的單位 sec / meter 便可。這點AI可以幫助我們快速換算。
位於東歐的保加利亞,其首都是蘇菲亞,這家公司成立於1997年,創辦人是 Peter Mitev 與 Vladimir Koylazov (Vlado), Peter Mitev 是CEO。1998年才正式營運,開始接廣告案子, 當時的經濟很不好,特別是廣告業。Peter的背景也是程式設計師,就在那時候發覺可以替業界開發軟體 ,在大學遇到 Vlado。Peter的大學時代大部分都在翹課,那時候遇到Vlado正在撰寫他高中時的遊戲引擎。Peter當時一家軟體公司上班,這家公司舉辦了比賽,有提供獎項,而Vlado參與了這個遊戲引擎,他還贏得了第一名! 而且還是Peter去頒的獎!
In this article, I am going to share my tips & tricks for making realistic honey with Phoenix FD.
1. Modeling a honeycomb
Finding a photo-realistic model is very difficult. Even you have a budget to purchase from the online shop doesn't guaranty you get the right 3D model for the project. So I decided to model it by myself.
I found a handy tool from Scriptspot - Honeycomb, a maxscript by Anubis. This script allows you to generate a honeycomb shape with just one button.
We recently introduced the Artillery Explosion tutorial available in Phoenix FD’s documentation. Now, we want to show you a variation of this scene setup - a winter explosion with its proper shading.
This scene is essentially the same as the Artillery Explosion one, except for the smoke color and HDRI lighting. The smoke color is set to light gray in order to get a snowy look. To focus on the shading we also limit the number of bombs to just one.
Since there is a hot explosion at the core, it could make the rendering over-exposed or lose detail in the white smoke volumetric shading.
The good news is Phoenix FD provides a cohort of parameters allowing you to fine-tune the shading. Here we compare some of the useful settings that deal with this issue.
Overall Setup
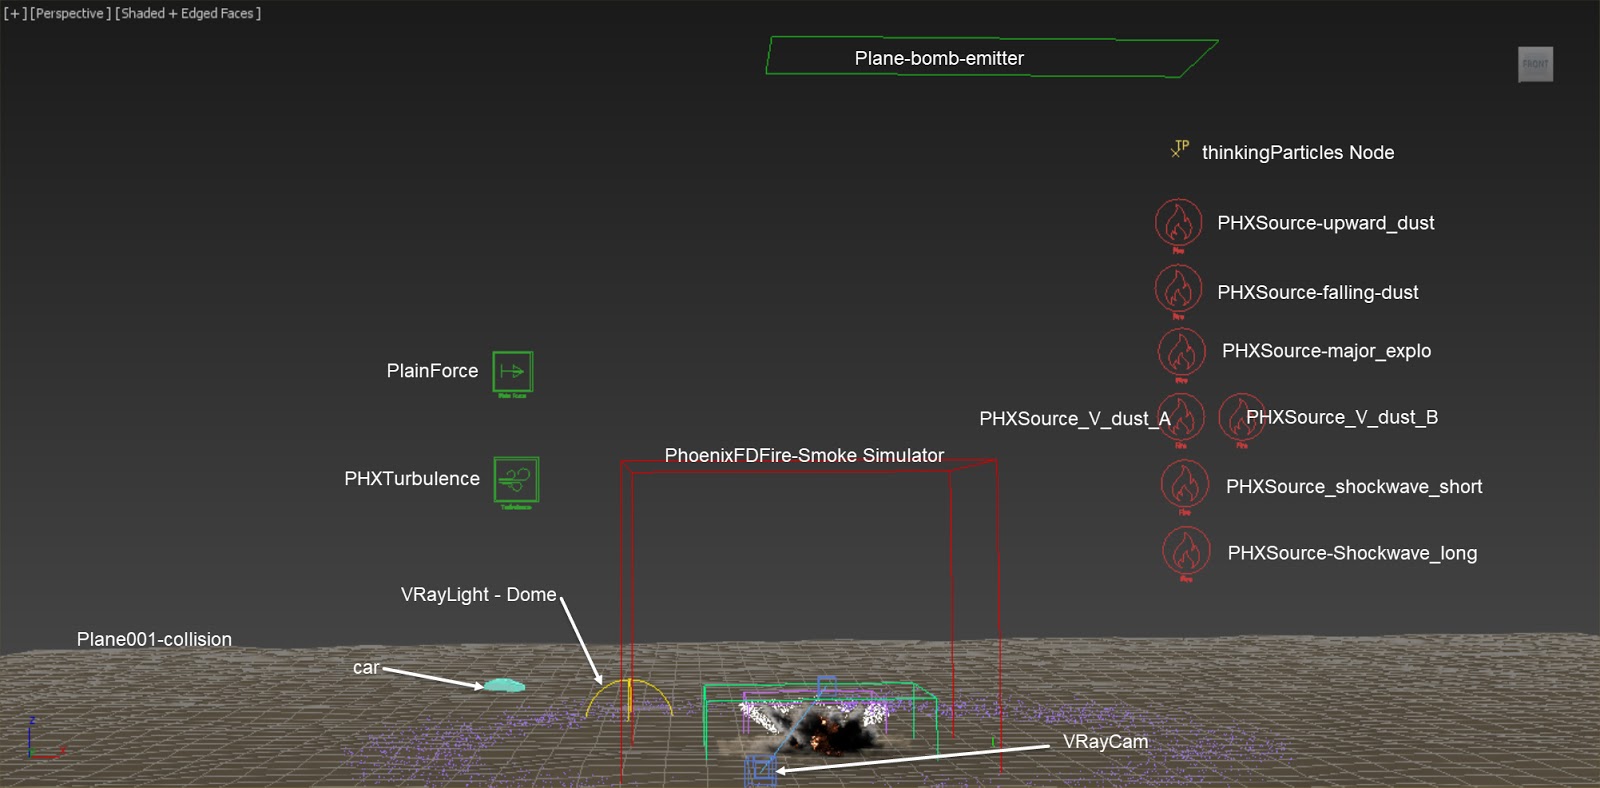
The scene we use here is modified from the Artillery Explosion scene, except we add one Phoenix FD Turbulence helper and change the color of the smoke. For a step-by-step tutorial of how the Fire / Smoke sources and thinkingParticles are set up, please check out the Artillery Explosion tutorial.
Whitewater is formed in a rapid, when a river's gradient increases enough to generate so much turbulence that air is entrained into the water body, that is, it forms a bubbly or aerated and unstable current; the frothy water appears white. --- Wikipedia
In this article, I am going to show you how to set up whitewater shading with Phoenix FD.
To set up a scene for whitewater shading you will need:
1. A Phoenix FD Liquid Simulator - for simulation of liquid and generate "Vorticity smooth" data
2. A Phoenix FD Fire/Smoke Simulator - this is not for simulation. This Fire/Smoke Simulator doesn't have to be high resolution, because it purely functions as a container to load up "Vorticity smooth" data from Liquid Simulator, and shading / rendering them as smoke.
3. LiquidSrc