2026/01/09
Surface condensation with Phoenix FD 表面張力水珠
by Hammer Chen
(Click Here to download the sample scene for max 2015)
Do you know you can create photo realistic surface condensation with Phoenix FD? The key is using a procedural texture map - Stucco as a mask for the LiquidSrc.
You could also animate the texture map (i.e., Z offset in this example), with the right timing you could get waterdrop sliding over the fruit surface.
Surface Tension is another key to simulate realistic droplet. The Droplet Breakup parameter controls the balances between the liquid forming tendrils or droplets. For more detail, you could visit Phoenix FD official help page.
Fluid color mixing with Phoenix FD 牛奶巧克力混色教學
by Hammer Chen
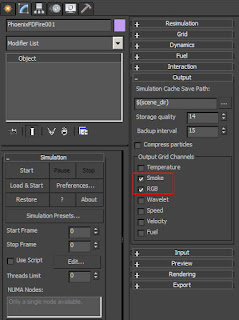
Phoenix FD allows you to mix the liquid with different RGB color, chocolate, and milk for example. Here are few steps you can follow:
1. Out Grid RGB Channel
Fruit explosion using turbulence 亂流產生水果爆炸
by Hammer Chen
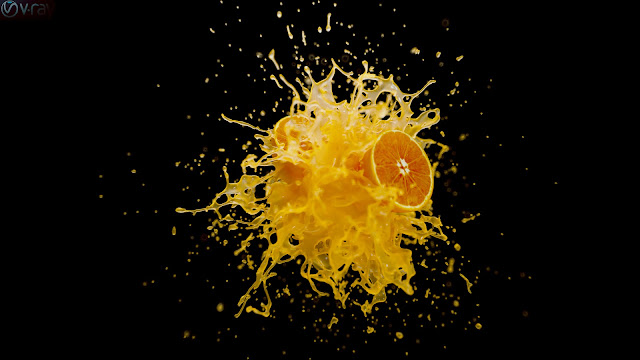
How could you explode a liquid in CG? The most intuitive approach is to put a gravity in the center of orange with a negative value. Here we use Phoenix FD Turbulence to agitate the liquid, making it spray out.
Create one Phoenix FD Turbulence in your scene and animate it's size and strength multiplier.
Creating a shockwave with Phoenix FD 衝擊波特效
By Hammer Chen
Making of Fruit Explosion 水果爆炸特效教學
By Hammer Chen, Kristin Ivanova
In this article, I show how to create a fruit explosion with Phoenix FD for 3ds Max. The fruit explosion consists of two fruits colliding at a high speed, then they smash and their juices splash out.
For the purpose of illustrating this article, we’ve shaded the fruits to get a tomato-ye look. However, the shape and shaders of the two geometries can be customized to your liking to get whatever kind of fruit you want to smash We don’t focus on the shading information of the fruits here..
The most challenging part of this animation is the fruit mesh smashing. Instead of softbody or cloth simulation, I use 3ds Max's Morpher Modifier and keyframe the splitting fruit meshes. I avoid using any softbody/cloth simulation in this tutorial, because it is difficult to control the results. By keyframing the animation, you have full control and are able to add layers of detail.
Since the mesh motion purely relies on keyframe animation, it is crucial to find the right reference footage to align with. You could search for keywords like "high speed fruit" or "fruit explosion." Or you can go through any stock footage sites. Once you find a good footage, load it in 3ds Max. This way, you can align your keyframe animation to the footage in the viewport accurately.
1. Fruit geometry deformation
Based on observation from reference videos, I concluded that one basic fruit mesh and four different deformed meshes would be enough to recreate the fruit splitting effect. Start from modeling the basic shape. The fruit is modified from a simple sphere and the mesh is split as shown in the image above. All other four deformed meshes are derived from this basic mesh. This is to make sure all five geometries have the same topology and can be used as morph targets later.
We duplicate the basic mesh into four other meshes.. By moving the vertices or adding modifiers on top, we create four different deformed fruit meshes: split, bump_shape, dent, and FFD_deformed. These four geometries represent the various stages of changing the shape of the fruit during the collision. Add a Morpher modifier to the basic mesh and load up the four geometries as morph targets.
Fruit splashes with Phoenix FD 掉落水花效果
Ever wanted to create high-speed fruit splashes photography in 3dsMax? With Phoenix FD, it might be much easier than you thought.
A. Rigid body dynamics with PFlow
Once your 3D fruit geometry is ready, import it into your scene and layout your objects like this:

You could create a basic MassFX Pflow by right click on your PFlow / New / mParticles Flow
Procedural ground dust with Phoenix FD 程序性產生煙塵
by Hammer Chen
It will be a very tedious job if we have to mannualy adding smoke emitters at each hoof of horses.
Fortunately, with the help of VRayDistance map, we could generate ground dust more procedurally. Here we have one single Alembic file containing hundreds of animated horse and one ground plane.
Phoenix FD Maelstrom tutorial 漩渦教學
By Hammer Chen
(This Tutorial was disapproved by my supervisor cause it take some tricks and might not be physically accurate maelstorm. Anyway, today I share it here for those who need it.)
This tutorial will show you how to make a big whirlpool with Phoenix FD. Instead of using a 3dsMax standard vortex force, we will design a particular geometry (a large funnel), and an array of emitters sit on the edge of a funnel, creating an artificial whirlpool. The idea is inspired by the Giant Whirlpool outside Marina Bay Sands Hotel, a Singapore attraction. We will also simulate Foam, Splashes, and Mist. A ship was also placed in the scene, and we set keyframes for the ship, and created a realistic whirlpool.
This method is excellent for a close-up shot, highly detailed whirlpool, but it might not be suitable for making whirlpools on an infinite ocean. For maelstrom on an infinite ocean, we will prepare another tutorial using 3dsMax standard vortex force, which is perfect for a wider shot.

1. System Unit
The funnel geometry in this tutorial is about 1650 cm in diameter, and the length of the ship is about 235 cm, so we use centimeters as our system unit.

2. Animation Length
Set the animation length to 300 in Time Configuration. Because it takes a few frames until water flood covers the whole surface of the funnel, the actually usable animation is ranging from frame 190 to frame 290.

3. Scene Layout
There is a ship in the scene; its size is about 238 cm in length. A funnel with a diameter of 1650 cm. A sphere with a radius of 99 cm, and placed right below the funnel. We also use this sphere as the source of the Body Force, letting the liquid flow down the funnel, and also attracted by the Body Force, like a sinkhole. There are 16 Boxes arranged along the edge of the funnel. The emitting direction is tangent to the side of the funnel so that the liquid flow forms a whirlpool naturally. A LiquidSrc, select 16 boxes as the source. The three Particle Shaders for Splash, Foam, and Mist respectively. We also created a Cylinder that can be used as a liquid Cutter Geom at the edge of the funnel, which cuts off the liquids and particles we don't want.
Creating Fluid with FollowPath in PhoenixFD 流水特效
For most of Phoenix FD users, you probably aware there is a helper called PathFollow comes from Phoenix FD. It allows your fluid (water or smoke/fire) moving along a spline. But if you leave its parameters as default, there are high chances you get this cucumber shape of water stream:
The key to making your water stream looks realistic is introduce falloff to the FollowPath. To do so, you can also use Phoenix FD 's Force Preview while tweaking the force:
Noted the color difference at the edge of the spline, you see a beautiful red-to-blue transition of that force strength.
Making of Fire Trails 火道與火焰特效教學
By Hammer Chen, Gergana Lilkova
This is a kind of request tutorial. Many people have been asking me how I created a burning car in my previous "Burning Car RnD" video. It was done with fuel-based burning. The fuel starts to burn when the temperature reaches its ignition temperature. Fuel-based fire gives you a realistic burning effect; however, the fuel itself is a fluid, meaning the fuel will flow all over the surface. The overflow of fuels is harder to control and might cause undesired results.
In this tips & tricks article, I am going to show you an alternative method for creating a growing fire, based on an animated mask. The mask is generated with VRayDistanceTex from an animated box. Since we have full control over how far and how fast the mask expands, the fire is more directable than fuel-based. This method is more practical for production. That's why I prefer this technique.
Though I am using fire trails as an example, the same concept can be applied to many other burning effects - like a burning watchtower, a burning paper with the flame growing on a path of a letter, etc.
2026/01/08
Phoenix FD Variable viscosity 可變黏度
By Hammer Chen, Kristina Gaytandzhieva, Kristin Ivanova
This scene is actually a small test I did back in 2018, for variable viscosity - a new feature of Phoenix 3.10 at the time. I found this scene in my drive while I was looking for my previous works. Some people liked it, so I decided to share how I set up the scene.
Final animation
Car Explosion with Phoenix and tP 汽車爆炸製作教學
- Car rigid body simulation: hinges joint for car doors and spring joint for car suspension
- VolumeBreaker for shattering glasses
- Fire and explosion with Chaos Phoenix, using thinkingParticles; particles are used as fluid sources.
Nuclear Bomb Explosion with Condensation Rings 核爆與凝結環製作教學
- the nuclear bomb explosion itself that simulates the rings, too (PhoenixFDFire-Nuke),
- the cloudscapes (PhoenixFDFire-Cloud),
- the fog that covers a larger region (PhoenixFDFire-fog),
- and the lower fog (PhoenixFDFire-fog-lower).
2026/01/07
Termbase for 3D CG articles 電腦動畫文章翻譯資料庫
這篇文章延續了我兩年前被 Chaos Group V-Ray 辭職一事所寫的內容,但這次我想把重點放在 3D CG 相關文章的翻譯詞彙資料庫上,因此才會下這樣的標題。
首先我要說明的是:我在 Chaos 的前主管 Claudio Meireles(CI Mei)在兩年前開除我時,完全沒有進行任何職務交接。所謂的職務交接,至少應該包含以下幾個項目:
- 確認在該公司的各項帳號(包含 YouTube 帳號)權限已確實取消
- 要求該員於任職期間所累積的相關資產進行提交
- 對接替職務的員工進行必要的教育訓練
以上三項,我的主管 Claudio Meireles 一項都沒有做到。我當時還特別提醒他,幾乎九成以上在中國發表的文章都是由我翻譯完成的,而 Claudio 回覆我說,未來 Chaos 不需要再把文章進行中文化。事實上,在我離職之後,Claudio 仍然讓趙樹森(Shusen Zhao)繼續接替我的翻譯工作。
在我任職 Chaos 的七年期間,我翻譯了大量技術文章、新產品與新功能的發表內容,以及數小時以上的教學影片。剛開始時,翻譯工作完全是以人工方式進行;後來為了提高效率,我開始把常用的專業詞彙整理成表格。長期累積之下,便能透過自動化的 script,快速修正電腦翻譯,甚至是 AI 翻譯可能產生的錯誤。
這篇文章的目的,就是要介紹這個 3D CG/動畫相關文章的翻譯資料庫架構與內容。當然,我不會完整公開整個資料庫,而是希望將資料庫中所包含的詞彙類別加以整理與說明,在這個 AI 翻譯當道的時代,嘗試找出一條人類仍然具有價值與角色的方向。
2025/12/03
From Gaea to 3dsMax 輸出貼圖與模型快速教學
最近趁特價購買了一套專業版的QuadSpinner Gaea 2.2。這是地形產生軟體。最大的好處是他有很多sample scenes可以直接拿來修改成自己要的,算是非常容易上手,效果也很專業。
2025/10/28
Phoenix FD以Particle為Source的技巧
今天來談談以Particle作為Phoenix FD的Fire Smoke Source的技巧。一般來說我們會用幾何體的某個表面來作為Fluid Source,但是在某些情況用particle作為來源會更好。
比方說飛彈的拖尾煙。因為飛彈往往飛得很快,如果只用飛彈的幾何體的話,必須要很高的Steps per frame才能產生不會斷斷續續的煙霧。這樣模擬會非常沒有效率。
如果是用particle的話,可以用其life span來控制拖尾的長度,因此SPF就不需要這樣高,會更有效率進行模擬。
還有一點要注意的是,Phoenix FD的Source mode有三種模式,其中Volume Brush會更適合用在拖尾煙效果。預設的Surface Force Mode並不好控制,效果也比較不好。
而在以Particle作為Source時,其中最重要的參數是Custom Prt Size,用來控制Src的粒子大小。在決定這個數值到底要多大時,可以參考Simulator的Voxel Size。可以用Vozel Size為基準點然後調小一點。也就是說Grid resolution會明顯地影響你需要設置Custom Prt Size的大小,這點要特別注意。


