2026/01/09

VRayVolumeGrid and Nuclear Explosion 核爆整合


By Hammer Chen

In this article I am going to show you the benefit of using Phoenix FD in tandem with VRayVolumeGrid. I will use a nuclear explosion as an example.

Phoenix FD is capable of simulating complex explosions, such as air strike, small or large scale explosion. For a realistic blast, it always involves many different components. For example, the nuclear explosion you have a major mushroom cloud that flies into the sky; and the ground dust triggered by the mushroom cloud explosion. With multiple fire/smoke sources, Phoenix FD can perform realistic nuclear explosion simulation. In fact, you can find a downloadable nuclear explosion scene on the ChaosGroup official sample page.

With that said, what if you want extra degree of freedoms for tweaking and shaping the extract nuke you want. Simulating each component separately might be a way to go. I'll explain why.

A collection of reference images from the Internet

Let’s take a look at physical reality. A nuclear bomb was placed on the ground, somewhere in an unknown desert. When the bomb blast off, initiate the chain reaction, heat climbing and generate lots of smoke as a by-product the chemical reaction; that major explosion pushes the ground dust which is already there before the blast. We can say the physical properties of those two elements (the ground dust and explosive mushroom) are no doubt different things.

Bullet Time with Phoenix FD 子彈時間慢動作特效


By Hammer Chen

Have you ever wondered how to create a bullet-time effect for liquids with Phoenix FD? Especially when working with rigid body simulation? The answer is surprisingly simple: animate the Phoenix FD's "Time Scale" parameter. In this article, I am going to show you the workflow.

1. Scene Setup
We have two wine glasses in the scene  and a sphere flying from right to left, that hits and breaks the glasses. You can use any package to simulate the rigid body dynamics, for example,  PFlow mParticles or RayFire. In this case, I use thinkingParticles.

Visualize your forces with Force Preview 視覺化力場


by Hammer Chen

When dealing with complex scene, sometimes you have to adjust forces in the scene back and forth to get the desired results. You have to change parameters, run the sim, render preview and change parameters again.

For creating ocean maelstrom, adding a vortex force might be a quick answer. However, finding the right parameters could be a nightmare for you. If the orbital speed too high, or it's falloff too short. Or if there is not enough radial pull. You might not be able to get the right maelstrom.

With new Force Preview, you can see how Phoenix or standard 3ds Max forces will influence the simulation — without multiple iterations

Making of a Burning Motorcycle 燃燒的摩托車


By Hammer Chen

In this article, I am going to show you some of the critical steps of making this burning motorcycle image with Phoenix FD.


The model was kindly provided by Lien Ying-Te. Though this is a sub-D model, there are a lot of parts and faces in the geometry. The first thing I do is attach all the pieces into one single mesh, and then use ProOptimizer to reduce the polyfaces to roughly 10% of its original polycounts. You get a significant simulation performance increase when you have fewer polycounts as a fire/smoke source.

Making clouds with Phoenix FD 雲朵模擬教學


by Hammer Chen

Do you know you can create realistic cloud by simply budding off smoke from a single plane? The key is using the right mask and scattering setting.

Here we have one 3dsMax plane primitive as Fire / Smoke source. (Please note that Phoenix FD doesn't like non-closed geometry. If you having any trouble emitting fluid from a plane, add a shell modifier to the plane can fix the issue)

Phoenix FD: Pure Ocean mode 純海洋模式


This small handy feature allows you to preview ocean mesh without any simulations. The video was recorded by Svetlin Nikolov.


Surface condensation with Phoenix FD 表面張力水珠


by Hammer Chen

(Click Here to download the sample scene for max 2015)

Do you know you can create photo realistic surface condensation with Phoenix FD? The key is using a procedural texture map - Stucco as a mask for the LiquidSrc.

You could also animate the texture map (i.e., Z offset in this example), with the right timing you could get waterdrop sliding over the fruit surface.

Surface Tension is another key to simulate realistic droplet. The Droplet Breakup parameter controls the balances between the liquid forming tendrils or droplets. For more detail, you could visit Phoenix FD official help page.

Image-based colored smoke 用貼圖控制煙霧顏色


by Hammer Chen

Creating an image-based colored smoke is pretty straightforward with Phoenix FD. Here are three key steps you need to know:

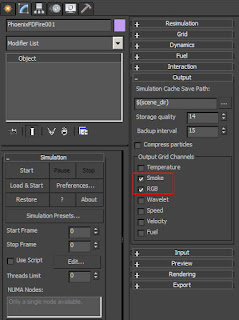
1. Output RGB channel
Check RGB checkbox in the output section


Fluid color mixing with Phoenix FD 牛奶巧克力混色教學


by Hammer Chen

Phoenix FD allows you to mix the liquid with different RGB color, chocolate, and milk for example. Here are few steps you can follow:

1. Out Grid RGB Channel

2. Set two of your LiquidSrc with different RGB color. In this particular example, I set my milk LiquidSrc with black RGB color and white for chocolate.

Fruit explosion using turbulence 亂流產生水果爆炸


by Hammer Chen

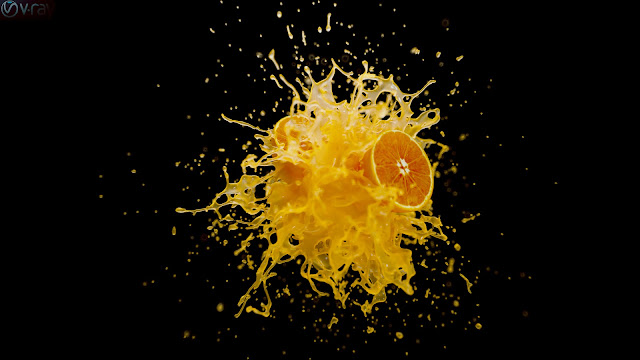
How could you explode a liquid in CG? The most intuitive approach is to put a gravity in the center of orange with a negative value. Here we use Phoenix FD Turbulence to agitate the liquid, making it spray out.

Create one Phoenix FD Turbulence in your scene and animate it's size and strength multiplier.

Creating a shockwave with Phoenix FD 衝擊波特效


By Hammer Chen

This tutorial is requested by one of our users who said that it was difficult to create a shockwave with Phoenix FD. Here, I am going to explain the critical step that he might miss.

This is my scene setup: a Pflow (PF Source) in the middle, spreading out particles horizontally; a PhoenixFD Fire / Smoke Simulator; and a Phoenix FD Fire / Smoke Source (PHXSource) that picked up the PF Source in the scene.

Making of Fruit Explosion 水果爆炸特效教學


By Hammer Chen, Kristin Ivanova

In this article, I show how to create a fruit explosion with Phoenix FD for 3ds Max. The fruit explosion consists of two fruits colliding at a high speed, then they smash and their juices splash out.

For the purpose of illustrating this article, we’ve shaded the fruits to get a tomato-ye look. However, the shape and shaders of the two geometries can be customized to your liking to get whatever kind of fruit you want to smash We don’t focus on the shading information of the fruits here..

The most challenging part of this animation is the fruit mesh smashing. Instead of softbody or cloth simulation, I use 3ds Max's Morpher Modifier and keyframe the splitting fruit meshes. I avoid using any softbody/cloth simulation in this tutorial, because it is difficult to control the results. By keyframing the animation, you have full control and are able to add layers of detail.

Since the mesh motion purely relies on keyframe animation, it is crucial to find the right reference footage to align with. You could search for keywords like "high speed fruit" or "fruit explosion." Or you can go through any stock footage sites. Once you find a good footage, load it in 3ds Max. This way, you can align your keyframe animation to the footage in the viewport accurately.


1. Fruit geometry deformation
Based on observation from reference videos, I concluded that one basic fruit mesh and four different deformed meshes would be enough to recreate the fruit splitting effect. Start from modeling the basic shape. The fruit is modified from a simple sphere and the mesh is split as shown in the image above. All other four deformed meshes are derived from this basic mesh. This is to make sure all five geometries have the same topology and can be used as morph targets later.


We duplicate the basic mesh into four other meshes.. By moving the vertices or adding modifiers on top, we create four different deformed fruit meshes: split, bump_shape, dent, and FFD_deformed. These four geometries represent the various stages of changing the shape of the fruit during the collision. Add a Morpher modifier to the basic mesh and load up the four geometries as morph targets.

Fruit splashes with Phoenix FD 掉落水花效果

by Hammer Chen

Ever wanted to create high-speed fruit splashes photography in 3dsMax? With Phoenix FD, it might be much easier than you thought.

A. Rigid body dynamics with PFlow
Once your 3D fruit geometry is ready, import it into your scene and layout your objects like this:


You could create a basic MassFX Pflow by right click on your PFlow / New / mParticles Flow

Procedural ground dust with Phoenix FD 程序性產生煙塵


by Hammer Chen

It will be a very tedious job if we have to mannualy adding smoke emitters at each hoof of horses.

Fortunately, with the help of VRayDistance map, we could generate ground dust more procedurally. Here we have one single Alembic file containing hundreds of animated horse and one ground plane.

Phoenix FD Maelstrom tutorial 漩渦教學


By Hammer Chen

(This Tutorial was disapproved by my supervisor cause it take some tricks and might not be physically accurate maelstorm. Anyway, today I share it here for those who need it.)

This tutorial will show you how to make a big whirlpool with Phoenix FD. Instead of using a 3dsMax standard vortex force, we will design a particular geometry (a large funnel), and an array of emitters sit on the edge of a funnel, creating an artificial whirlpool. The idea is inspired by the Giant Whirlpool outside Marina Bay Sands Hotel, a Singapore attraction. We will also simulate Foam, Splashes, and Mist. A ship was also placed in the scene, and we set keyframes for the ship, and created a realistic whirlpool.

This method is excellent for a close-up shot, highly detailed whirlpool, but it might not be suitable for making whirlpools on an infinite ocean. For maelstrom on an infinite ocean, we will prepare another tutorial using 3dsMax standard vortex force, which is perfect for a wider shot.


1. System Unit
The funnel geometry in this tutorial is about 1650 cm in diameter, and the length of the ship is about 235 cm, so we use centimeters as our system unit.


2. Animation Length

Set the animation length to 300 in Time Configuration. Because it takes a few frames until water flood covers the whole surface of the funnel, the actually usable animation is ranging from frame 190 to frame 290.


3. Scene Layout

There is a ship in the scene; its size is about 238 cm in length. A funnel with a diameter of 1650 cm. A sphere with a radius of 99 cm, and placed right below the funnel. We also use this sphere as the source of the Body Force, letting the liquid flow down the funnel, and also attracted by the Body Force, like a sinkhole. There are 16 Boxes arranged along the edge of the funnel. The emitting direction is tangent to the side of the funnel so that the liquid flow forms a whirlpool naturally. A LiquidSrc, select 16 boxes as the source. The three Particle Shaders for Splash, Foam, and Mist respectively. We also created a Cylinder that can be used as a liquid Cutter Geom at the edge of the funnel, which cuts off the liquids and particles we don't want.

Creating Fluid with FollowPath in PhoenixFD 流水特效

by Hammer Chen

For most of Phoenix FD users, you probably aware there is a helper called PathFollow comes from Phoenix FD. It allows your fluid (water or smoke/fire) moving along a spline. But if you leave its parameters as default, there are high chances you get this cucumber shape of water stream:


The key to making your water stream looks realistic is introduce falloff to the FollowPath. To do so, you can also use Phoenix FD 's Force Preview while tweaking the force:

Noted the color difference at the edge of the spline, you see a beautiful red-to-blue transition of that force strength.

Making of Fire Trails 火道與火焰特效教學


By Hammer Chen, Gergana Lilkova

This is a kind of request tutorial. Many people have been asking me how I created a burning car in my previous "Burning Car RnD" video. It was done with fuel-based burning. The fuel starts to burn when the temperature reaches its ignition temperature. Fuel-based fire gives you a realistic burning effect; however, the fuel itself is a fluid, meaning the fuel will flow all over the surface. The overflow of fuels is harder to control and might cause undesired results.

In this tips & tricks article, I am going to show you an alternative method for creating a growing fire, based on an animated mask. The mask is generated with VRayDistanceTex from an animated box. Since we have full control over how far and how fast the mask expands, the fire is more directable than fuel-based. This method is more practical for production. That's why I prefer this technique.

Though I am using fire trails as an example, the same concept can be applied to many other burning effects - like a burning watchtower, a burning paper with the flame growing on a path of a letter, etc.

Overall setup. The fire is emitted from the plane on the ground. To control where the fluid is to be emitted, we place an animated box on top of the plane. The box is then added to the VRayDistanceTex object list. The VRayDistanceTex is a V-Ray specific procedural texture that returns a different color based on a point's distance to an object(s) specified in a selection list. So this procedural texture can be used in the mask slot of PHXSource. This way, we can direct the growth of fire simply by keyframing the box.

2026/01/08

Phoenix FD Variable viscosity 可變黏度


By Hammer Chen, Kristina Gaytandzhieva, Kristin Ivanova

This scene is actually a small test I did back in 2018, for variable viscosity - a new feature of Phoenix 3.10 at the time. I found this scene in my drive while I was looking for my previous works. Some people liked it, so I decided to share how I set up the scene.


Final animation


Scene setup
The simulation setup consists of a highly viscous liquid which is emitted from a teapot.
The emission was masked by using a Stucco texture, so the yellow-slimy liquid seemed to come out from small pores on the teapot. I used the same texture to map the viscosity of the Liquid source. To make the animation more interesting, I assigned a Waveform controller to the Outgoing Velocity of the liquid source. A V-Ray Dome light was used for the lighting, the HDRI is from Chaos Cosmos (Studio 002).

Car Explosion with Phoenix and tP 汽車爆炸製作教學


By Hammer Chen, Kristin Ivanova

In this article I put everything I learned about thinkingParticles and Phoenix explosions together. Car explosion is my go-to scene setup as it contains some key components: 
  1. Car rigid body simulation: hinges joint for car doors and spring joint for car suspension 
  2. VolumeBreaker for shattering glasses
  3. Fire and explosion with Chaos Phoenix, using thinkingParticles; particles are used as fluid sources. 
Once again, with this setup I cover all the essential components for a basic but convincing car explosion. 

Final animation

Here are the key steps for setting up the scene. Though I use thinkingParticles for the particles/dynamics effects, the concept is applicable even when using other particle systems such as PFlow or tyFlow, for some parts of the scene setup at least. 

Although the tips and tricks I convey here are pretty straightforward, the actual setup can be rather complex. You need some basic knowledge of thinkingParticles and Phoenix to begin with.

A Solid car model

Nuclear Bomb Explosion with Condensation Rings 核爆與凝結環製作教學


By Hammer Chen, Kristin Ivanova, Slavina Nikolova

The last blog  post “VrayVolumeGrid and Nuclear Explosion” talks about how you can create a nuclear explosion on the ground. But how about a nuclear explosion in a humid sky? In this proof-of-concept setup, I show you how to create nuclear condensation rings with Phoenix, simply by brushing out some smoke from manually arranged Tube geometries. The cloudscape below is also simulated with Phoenix.

How exactly do these condensation rings form? The condensation cloud, also known as a Wilson cloud, is formed by transit water vaporization around the nuclear blast. 

When a nuclear weapon or a large amount of a conventional explosive is detonated in insufficiently humid air, the "negative phase" of the shock wave causes a rarefaction of the air surrounding the explosion, but not contained within it. This rarefaction results in a temporary cooling of that air, which causes a condensation of some of the water vapor contained in it...Wikipedia

References


I searched for nuclear explosion images on the internet and there are some interesting rings around the nuclear fireball in these photos. Most of the bombs were detonated in the sea, where the humid condition facilitates the formation of condensation clouds.

Overall setup


Let's see how to set the scene. It contains four Fire/Smoke Simulators: 
  • the nuclear bomb explosion itself that simulates the rings, too (PhoenixFDFire-Nuke), 
  • the cloudscapes (PhoenixFDFire-Cloud), 
  • the fog that covers a larger region (PhoenixFDFire-fog), 
  • and the lower fog (PhoenixFDFire-fog-lower). 
Only the PhoenixFDFire-Nuke Simulator and the PhoenixFDFire-Cloud Simulator are actually running the simulation. The other two just have their Volumetric Options tweaked, with no simulation involved.


Let's try to match the real explosion as close as possible. The end result of the simulation fireball is around 520 meters in diameter, which is very close to the size in a reference image.

The nuke explosion serves as a light source in the scene. I don't add any other lights to the environment.